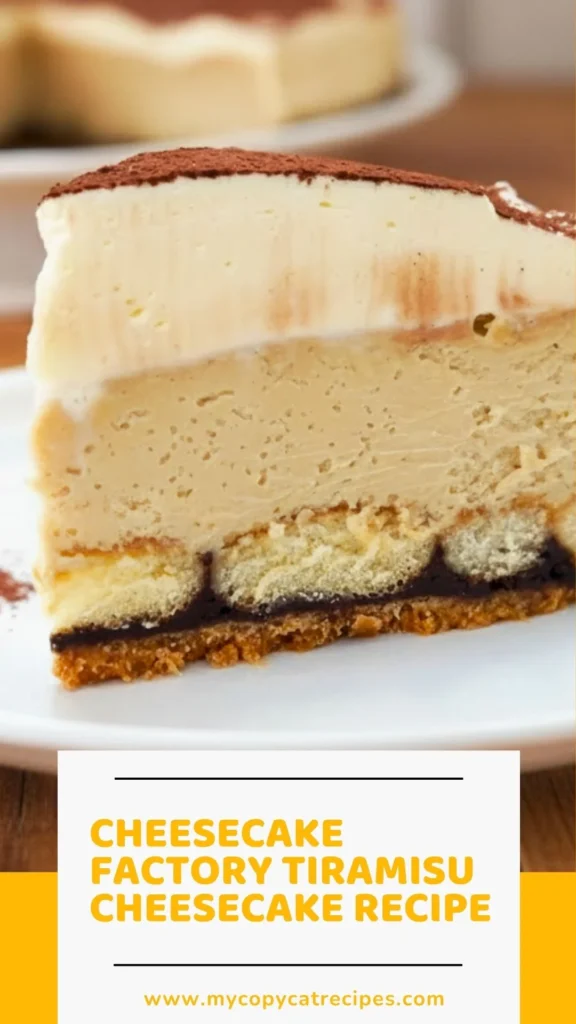
If you’ve ever experienced the indulgent magic of Cheesecake Factory tiramisu cheesecake, you know it’s not just dessert-it’s an experience. This legendary tiramisu cheesecake Cheesecake Factory creation brilliantly marries two iconic Italian and American desserts into one show-stopping masterpiece.
Imagine layers of creamy mascarpone-spiked cheesecake infused with robust espresso, nestled between delicate ladyfinger biscuits and dark chocolate ganache, all crowned with billowy whipped cream and a dusting of cocoa. This Cheesecake Factory tiramisu cheesecake recipe decodes the restaurant’s secret, allowing you to recreate this bakery-worthy dessert in your own kitchen.
Whether you’re celebrating a special occasion or simply craving that perfect balance of coffee, chocolate, and velvety cream cheese, this recipe delivers authentic tiramisu the Cheesecake Factory flavor with every heavenly slice.
What Does It Taste Like?
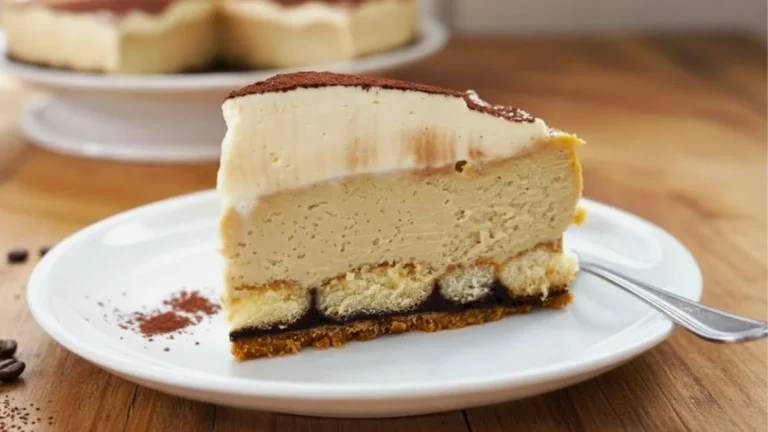
The Cheesecake Factory tiramisu cheesecake delivers an extraordinary sensory experience that coffee and dessert lovers dream about. The first bite reveals rich, tangy cream cheese beautifully balanced with sweet mascarpone and aromatic espresso that infuses every creamy layer.
The ladyfinger crust provides a tender, cookie-like foundation with subtle vanilla notes, while the dark chocolate ganache adds bittersweet intensity and luxurious texture. Coffee flavor permeates throughout without overwhelming, creating sophisticated depth rather than aggressive bitterness.
The whipped cream topping is cloud-like and barely sweet, offering textural contrast to the dense, silky filling. Finally, the cocoa powder dusting adds a gentle chocolate finish and elegant visual appeal. Each forkful of this tiramisu cheesecake factory creation combines creamy, crunchy, and silky elements in perfect harmony-decadent yet refined, sweet yet balanced.
Ingredients and Kitchen Utensils Lists
Ingredients
For the Ladyfinger Crust:
- 1¼ cups ladyfinger biscuits, ground into fine crumbs
- ¼ cup unsalted butter, melted
For the Ganache Layer:
- 3 oz dark couverture chocolate
- ¼ cup heavy cream
- 2 tablespoons unsalted butter
For the Cheesecake Filling:
- 3 packages (750g) cream cheese, room temperature
- 1 cup granulated sugar
- 1 cup mascarpone cheese
- ¼ cup cornstarch
- 2 teaspoons vanilla extract
- ¼ cup brewed espresso coffee, cooled
- 2 large eggs
- Extra whole ladyfinger biscuits (for middle layer)
For the Topping:
- 1¼ cups whipping cream
- 1 tablespoon instant skim milk powder
- 1½ tablespoons granulated sugar
- Splash of vanilla extract
- Cocoa powder (for dusting)
Kitchen Utensils
- 9-inch springform pan
- Parchment paper
- Food processor or rolling pin and plastic bag
- Medium mixing bowls (2-3)
- Stand mixer or hand mixer
- Small saucepan
- Rubber spatula
- Whisk
- Measuring cups and spoons
- Fine-mesh sieve (for cocoa powder dusting)
- Offset spatula or butter knife
- Cooling rack
Preparation and Cooking Time with Serving
Prep Time: 30 minutes
Bake Time: 45 minutes
Cooling/Chilling Time: 4-6 hours (or overnight)
Total Time: 5-7 hours
Servings: 12-14 slices
Difficulty Level: Intermediate to Advanced
Recipe Instructions with Steps
Step 1: Prepare the Ladyfinger Crust
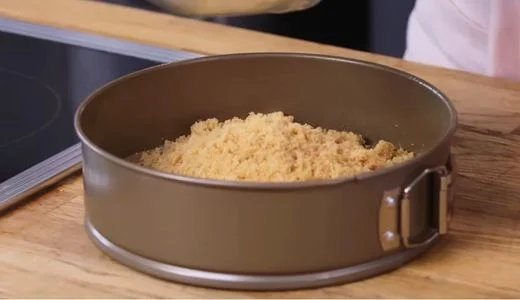
Preheat your oven to 350°F (175°C). Grease a 9-inch springform pan thoroughly with butter or non-stick spray, then line the bottom with a circle of parchment paper-this ensures your Cheesecake Factory tiramisu cheesecake releases perfectly. Using a food processor, pulse the ladyfinger biscuits until they form fine, uniform crumbs (alternatively, place biscuits in a sealed plastic bag and crush with a rolling pin). Transfer 1¼ cups of crumbs to a bowl and combine with ¼ cup melted unsalted butter, stirring until the mixture resembles wet sand and holds together when pressed. Press this mixture firmly and evenly into the bottom of your prepared pan using the back of a spoon or flat-bottomed measuring cup. Bake for exactly 10 minutes until lightly golden and fragrant, then remove and allow to cool completely on a wire rack.
Step 2: Create the Ganache and Ladyfinger Layer
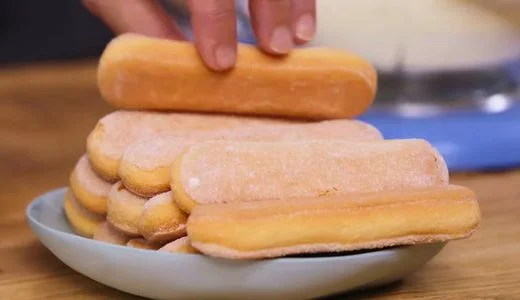
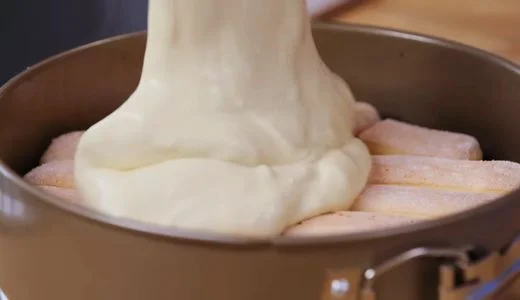
In a small saucepan over low heat, combine ¼ cup heavy cream and 2 tablespoons unsalted butter. Warm gently, stirring occasionally, until the butter melts and the mixture is hot but not boiling-about 2-3 minutes. Remove from heat immediately and add 3 ounces of chopped dark couverture chocolate. Let it sit undisturbed for 1 minute to allow the chocolate to soften, then whisk until completely smooth and glossy. Pour this rich ganache over your cooled ladyfinger crust, tilting and swirling the pan to create an even layer that reaches the edges. Working quickly before the ganache sets, arrange whole ladyfinger biscuits in a single layer across the ganache surface. Don’t soak them in coffee or espresso-the moisture from the tiramisu cheesecake Cheesecake Factory filling will soften them perfectly during baking. This hidden layer adds authentic tiramisu texture and flavor.
Step 3: Mix the Cheesecake Filling
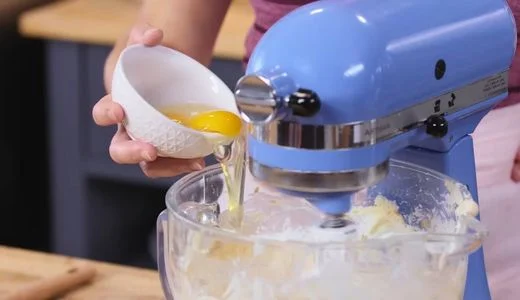
This step is crucial for achieving that signature the Cheesecake Factory tiramisu cheesecake texture. In a large bowl or stand mixer, beat the 3 packages of room-temperature cream cheese on medium speed for 2-3 minutes until completely smooth with no lumps-scrape down the sides frequently. Gradually add 1 cup granulated sugar, beating until fluffy and well incorporated. Add 1 cup mascarpone cheese and continue beating until the mixture is creamy and uniform. In a small bowl, whisk together ¼ cup cornstarch, 2 teaspoons vanilla extract, and ¼ cup cooled brewed espresso until the cornstarch dissolves completely. Pour this coffee mixture into your cream cheese base and mix on low speed until just combined. Finally, add 2 large eggs one at a time, mixing on the lowest speed after each addition-this prevents incorporating too much air, which causes cracking. Mix only until the eggs disappear into the batter.
Step 4: Bake the Cheesecake
Carefully pour the espresso-infused filling over your ladyfinger and ganache layers, filling the pan almost to the top-the filling will puff slightly during baking. Gently tap the pan on the counter 2-3 times to release any air bubbles. Place the springform pan on a baking sheet (to catch any potential drips) and bake at 350°F for exactly 45 minutes. The Cheesecake Factory tiramisu cheesecake recipe is done when the edges are slightly puffed and set with a light golden color, while a 3-inch circle in the center remains jiggly-it should wobble like gelatin when you gently shake the pan. This center will firm up during cooling. Turn off the oven, crack the door open slightly, and let the cheesecake sit inside for 15 minutes to prevent thermal shock and cracking. Remove and cool completely to room temperature on a wire rack (about 2 hours), then cover with plastic wrap and refrigerate for at least 4-6 hours or preferably overnight until fully set.
Step 5: Prepare and Apply the Topping
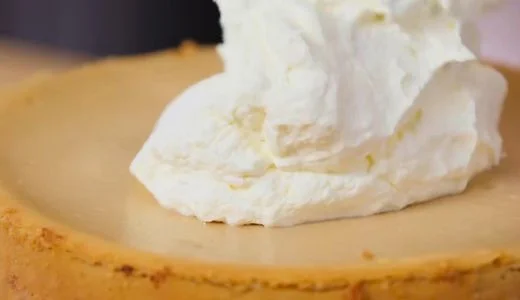
Once your tiramisu cheesecake factory creation is completely chilled and set, prepare the whipped cream topping. In a clean, cold mixing bowl (placing it in the freezer for 10 minutes beforehand helps), combine 1¼ cups cold whipping cream, 1 tablespoon instant skim milk powder (this stabilizes the cream and prevents weeping), 1½ tablespoons granulated sugar, and a splash of vanilla extract. Beat on medium speed until soft peaks form, then increase to medium-high until stiff peaks develop-the cream should hold its shape when the beater is lifted but still look smooth and creamy, not grainy. Don’t overbeat or you’ll make butter. Remove your chilled cheesecake from the refrigerator and carefully release the springform pan sides. Using an offset spatula, spread the whipped cream evenly over the top, creating decorative swirls if desired, or transfer to a piping bag and pipe rosettes for an elegant presentation.
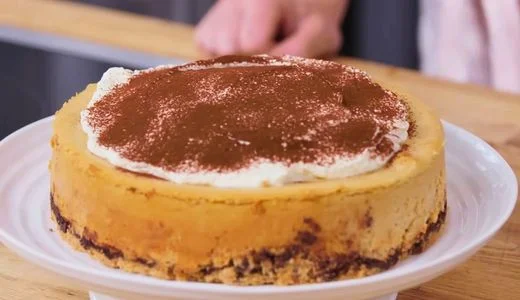
Step 6: Final Garnish and Serve
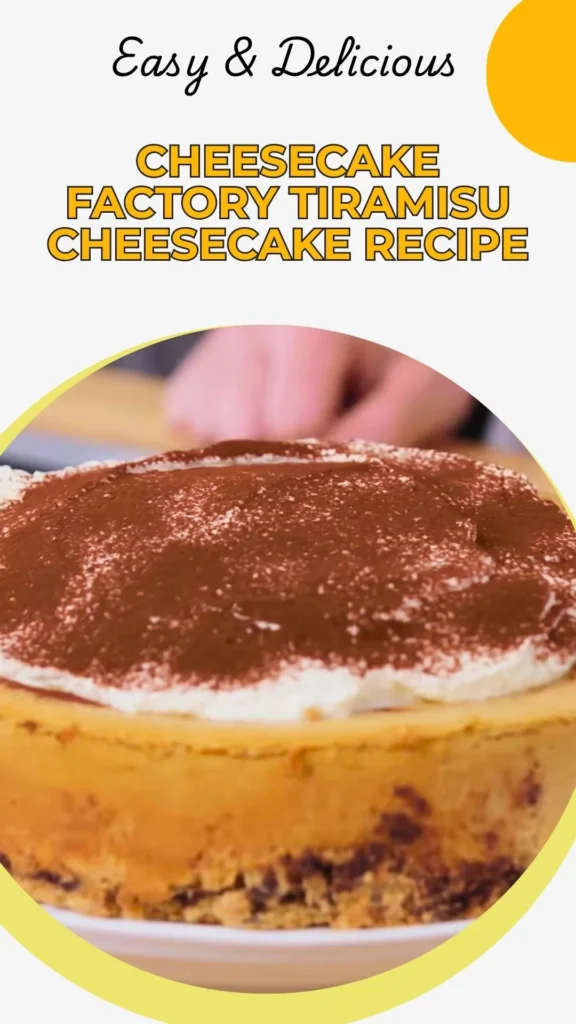
Place cocoa powder in a fine-mesh sieve and gently tap it over the whipped cream topping, creating an even dusting that mimics the classic tiramisu the Cheesecake Factory appearance. For clean, professional slices, use a sharp knife dipped in hot water and wiped dry between each cut. The Cheesecake Factory tiramisu is best served chilled but not ice-cold-remove from the refrigerator 10-15 minutes before serving to allow the flavors to bloom. Each slice should reveal distinct layers: the ladyfinger crust, dark ganache, coffee-soaked ladyfingers, creamy espresso filling, and cloud-like topping.
Customization and Pairing for Serving Ideas
1. Amaretto-Enhanced Variation
Elevate your Cheesecake Factory tiramisu cheesecake with authentic Italian flair by adding 2 tablespoons of amaretto liqueur to the cheesecake filling along with the espresso. The almond-flavored liqueur complements the coffee beautifully and adds sophisticated depth. You can also lightly brush the whole ladyfingers with a mixture of espresso and amaretto before layering them over the ganache, creating an even more authentic tiramisu experience that’s decidedly adult-oriented.
2. Individual Serving Presentation
Transform this tiramisu cheesecake Cheesecake Factory recipe into elegant individual portions perfect for dinner parties. Use 4-inch mini springform pans or even mason jars, layering the components in the same order. Baking time will reduce to approximately 25-30 minutes for mini pans. This presentation allows guests to enjoy their own perfectly portioned dessert and makes serving effortless. Top each with a decorative dollop of whipped cream, a dusting of cocoa, and a single espresso bean for garnish.
3. Coffee Pairing Excellence
Since the Cheesecake Factory tiramisu cheesecake celebrates coffee as a star ingredient, pairing it with the right beverage enhances the experience exponentially. Serve alongside a shot of authentic Italian espresso, which mirrors the dessert’s coffee notes. For a luxurious contrast, pair with a creamy cappuccino-the milk foam echoes the whipped topping. Non-coffee drinkers will appreciate a glass of sweet dessert wine like Vin Santo or Moscato d’Asti, which complements the mascarpone richness without competing with the espresso flavors.
4. Chocolate Lover’s Enhancement
For those who crave more chocolate intensity in their tiramisu cheesecake factory experience, increase the ganache layer by doubling the recipe and creating a thicker chocolate foundation. You can also fold 1/2 cup of mini chocolate chips into the cheesecake batter before pouring, creating pockets of melted chocolate throughout. Finish by shaving dark chocolate curls over the whipped cream topping alongside the cocoa powder for stunning visual appeal and extra chocolate dimension.
5. Seasonal Berry Complement
While traditional tiramisu doesn’t include fruit, serving your Cheesecake Factory tiramisu cheesecake recipe with fresh macerated berries creates a delightful contrast. Toss fresh raspberries or strawberries with a tablespoon of sugar and let them sit for 15 minutes to release their juices. The bright, tart berries cut through the rich cream cheese and provide refreshing balance. Serve a small spoonful alongside each slice, never on top, to maintain the classic cocoa-dusted presentation.
6. Espresso Powder Intensity Adjustment
Not everyone enjoys strong coffee flavor. For a milder tiramisu the Cheesecake Factory experience, reduce the espresso to 2-3 tablespoons, or substitute half with coffee-flavored liqueur like Kahlúa for sweetness without intense bitterness. Conversely, coffee enthusiasts can increase espresso to 1/3 cup and add 1 teaspoon of instant espresso powder to the filling for maximum coffee punch. Brush the ladyfinger layer with additional espresso before adding the filling for even deeper flavor penetration.
7. More Cheesecake Factory Favorites to Explore
If you enjoyed this Cheesecake Factory Tiramisu Cheesecake Recipe, you might also like exploring some of our other popular copycat dishes. Our Cheesecake Factory Nachos Recipe is perfect when you want a bold and shareable appetizer before dessert. For a creamy and comforting side dish, the Mission BBQ Mac and Cheese Recipe is always a reader favorite. And if you enjoy flavorful sauces that elevate any meal, don’t miss our Ike’s Dirty Sauce Recipe, which pairs wonderfully with many appetizers and snacks.

Tips Section
1. Room Temperature Ingredients Are Non-Negotiable
The single most important factor in achieving the silky, lump-free texture of Cheesecake Factory tiramisu cheesecake is using room-temperature cream cheese and mascarpone. Cold dairy creates lumps that won’t fully incorporate no matter how long you beat the mixture. Remove your cream cheese and mascarpone from the refrigerator at least 2 hours before starting, or cut into chunks and microwave in 10-second bursts at 30% power until softened but not melted. Room-temperature eggs also blend more smoothly into the batter. This seemingly small detail makes the difference between a grainy, amateur cheesecake and a professional, restaurant-quality result.
2. Preventing the Dreaded Crack
Cheesecake cracks occur from rapid temperature changes and overbaking. For crack-free the Cheesecake Factory tiramisu cheesecake, follow these techniques: Mix eggs on the lowest speed to avoid incorporating excess air that expands and cracks during baking. Don’t overbake-the center should still jiggle significantly when done. Use the oven-cooling method described in step 4, which gradually reduces temperature. Finally, never refrigerate a hot cheesecake; always cool to room temperature first. If cracks do appear, the whipped cream topping will cover them beautifully, so don’t panic.
3. Espresso Excellence Matters
Since coffee is a defining flavor in tiramisu cheesecake factory desserts, quality matters tremendously. Brew strong espresso using freshly ground dark roast beans-instant coffee produces inferior, bitter results. If you don’t have an espresso machine, use a Moka pot or make very strong coffee by doubling the grounds in your regular coffee maker. Allow the espresso to cool completely before adding to the batter; hot coffee will curdle the cream cheese. For deeper flavor, brew espresso the night before and refrigerate, which mellows any harsh notes while concentrating the coffee essence.
4. Ganache Troubleshooting
A smooth, glossy ganache layer elevates your Cheesecake Factory tiramisu from good to extraordinary. If your ganache separates or looks grainy, the chocolate was too hot or the ratio was off. Always remove cream from heat before adding chocolate, and use quality couverture chocolate (at least 60% cocoa) that melts smoothly. If separation occurs, add 1-2 teaspoons of warm cream and whisk vigorously until emulsified. For a thinner ganache that spreads more easily, add an extra tablespoon of cream. Work quickly when pouring-ganache sets fast and becomes difficult to spread evenly once cooled.
5. Ladyfinger Selection and Handling
Not all ladyfingers are created equal for tiramisu cheesecake Cheesecake Factory recipe success. Look for crispy, dry Savoiardi-style Italian ladyfingers rather than soft, cake-like varieties. The dry texture is essential-they’ll soften from the cheesecake moisture during baking and chilling without becoming mushy. When grinding for the crust, ensure they’re completely pulverized into fine crumbs for a cohesive base that holds together. For the middle layer, arrange whole ladyfingers tightly in a single layer with minimal gaps, trimming with a serrated knife if needed to fit your pan perfectly.
6. Whipped Cream Stabilization Science
Professional bakeries stabilize whipped cream to prevent weeping and deflation, and you should too for the Cheesecake Factory tiramisu cheesecake that lasts. The instant skim milk powder in this recipe absorbs excess moisture and strengthens protein structure, allowing your topping to hold for 2-3 days in the refrigerator. Alternatives include adding 1 teaspoon unflavored gelatin (bloomed in water) or 2 tablespoons cream cheese beaten until smooth. Always whip cream in a cold bowl with cold beaters-warm equipment prevents proper aeration. Stop beating the moment stiff peaks form; overwhipped cream becomes grainy and butter-like.
7. Make-Ahead and Serving Strategy
Tiramisu cheesecake factory desserts actually improve with time, making them ideal for advance preparation. The cheesecake itself can be made up to 3 days ahead; just wait to add the whipped cream topping until 4-6 hours before serving to ensure freshness. Cover tightly with plastic wrap, pressing it directly against the surface if not topping immediately to prevent skin formation. For cleanest slices, use a sharp knife dipped in very hot water and wiped completely dry between each cut-this melts through the dense filling effortlessly. Plan to remove the cheesecake from the refrigerator 15-20 minutes before serving so it’s perfectly chilled but not ice-cold, which mutes the delicate coffee and vanilla flavors.
Storage and Reheating Guidance
Store your Cheesecake Factory tiramisu cheesecake covered in the refrigerator for up to 5 days. The whipped cream topping is best within 2-3 days; after that, it may weep slightly. Never freeze assembled tiramisu cheesecake as the ladyfingers and whipped cream don’t freeze well. This dessert is meant to be served chilled, never reheated.
Common Queries and FAQs Section
Here, we’ve got you covered with some common questions that people often ask
Q: Can I use regular cream cheese instead of full-fat for this tiramisu cheesecake Cheesecake Factory recipe?
A: Full-fat cream cheese is essential for the proper texture and richness of the Cheesecake Factory tiramisu cheesecake. Low-fat or Neufchâtel cream cheese contains more moisture and less fat, resulting in a softer, less stable cheesecake that may not set properly and will have a tangier, less creamy flavor. The mascarpone already adds richness; don’t compromise further by using reduced-fat cream cheese.
Q: What if I can’t find mascarpone cheese for my tiramisu cheesecake factory dessert?
A: Mascarpone’s sweet, buttery flavor is signature to authentic Cheesecake Factory tiramisu, but if unavailable, you can substitute with an equal amount of full-fat cream cheese blended with 2 tablespoons of heavy cream and 1 tablespoon of sour cream. This approximates mascarpone’s texture and tang. Alternatively, ricotta cheese (drained overnight and blended smooth) mixed with a bit of heavy cream works in a pinch, though the flavor will be slightly different.
Q: Why did my cheesecake crack even though I followed the recipe?
A: Cheesecake cracking typically results from overbaking, rapid temperature changes, or overmixing. Ensure you’re removing the tiramisu the Cheesecake Factory cheesecake when the center still jiggles significantly-it continues cooking as it cools. Use an oven thermometer to verify your oven temperature is accurate; many ovens run hot. The gradual cooling method (turning off oven, cracking door) is crucial. Finally, overmixing after adding eggs incorporates too much air. Remember, cracks are purely cosmetic and will be hidden by whipped cream.
Q: Can I make this tiramisu cheesecake Cheesecake Factory recipe without alcohol?
A: Absolutely! This recipe doesn’t include alcohol by default, making it family-friendly. Traditional tiramisu uses coffee liqueur or rum, which you can add (2-3 tablespoons in the filling) for adult versions. The espresso provides all the classic flavor needed. If you want deeper complexity without alcohol, add an extra tablespoon of espresso or 1 teaspoon of vanilla extract. The dessert is delicious and authentic either way.
Q: How do I know when the cheesecake is perfectly baked?
A: The perfect Cheesecake Factory tiramisu cheesecake has edges that are set and slightly puffed with a pale golden color, while a 3-inch circle in the very center remains jiggly-it should wobble like firm gelatin when you gently shake the pan. An instant-read thermometer inserted into the center should read 150-155°F. The center will look underdone but will firm perfectly during the cooling and chilling process. Overbaking creates a dry, dense texture instead of the creamy, mousse-like consistency you want.
Q: Can I use instant coffee instead of brewed espresso?
A: While brewed espresso delivers superior flavor, you can substitute with strong instant coffee or instant espresso powder dissolved in hot water. Use 2 tablespoons instant espresso powder dissolved in ¼ cup hot water, then cooled. Regular instant coffee is weaker, so you’d need 3-4 tablespoons dissolved in ¼ cup water. The flavor won’t be quite as robust as real espresso, but it’s an acceptable shortcut that still produces a delicious tiramisu cheesecake factory result.
Q: Why is my ganache grainy or separated?
A: Ganache separates when chocolate is overheated or when the temperature difference between chocolate and cream is too extreme. Always remove cream from heat before adding chocolate, and use good-quality chocolate with enough cocoa butter to emulsify properly (avoid chocolate chips, which contain stabilizers). If your ganache splits, add 1-2 teaspoons of warm cream and whisk vigorously. If it’s grainy, the chocolate was scorched-unfortunately, there’s no fix, and you’ll need to start over with fresh chocolate and careful temperature control.
Q: How far in advance can I make this dessert for a party?
A: The Cheesecake Factory tiramisu cheesecake recipe is perfect for advance preparation. Make the cheesecake itself up to 3 days ahead and store covered in the refrigerator. Add the whipped cream topping 4-6 hours before serving for optimal freshness and texture. The ganache and ladyfinger layers actually improve with time as flavors meld. Don’t dust with cocoa powder until just before serving, as it can absorb moisture and look dull after sitting.

Cheesecake Factory Tiramisu Cheesecake Recipe
Ingredients
Equipment
Method
- Preheat your oven to 350°F (175°C). Grease a 9-inch springform pan thoroughly with butter or non-stick spray, then line the bottom with a circle of parchment paper-this ensures your Cheesecake Factory tiramisu cheesecake releases perfectly. Using a food processor, pulse the ladyfinger biscuits until they form fine, uniform crumbs (alternatively, place biscuits in a sealed plastic bag and crush with a rolling pin). Transfer 1¼ cups of crumbs to a bowl and combine with ¼ cup melted unsalted butter, stirring until the mixture resembles wet sand and holds together when pressed. Press this mixture firmly and evenly into the bottom of your prepared pan using the back of a spoon or flat-bottomed measuring cup. Bake for exactly 10 minutes until lightly golden and fragrant, then remove and allow to cool completely on a wire rack.
- In a small saucepan over low heat, combine ¼ cup heavy cream and 2 tablespoons unsalted butter. Warm gently, stirring occasionally, until the butter melts and the mixture is hot but not boiling-about 2-3 minutes. Remove from heat immediately and add 3 ounces of chopped dark couverture chocolate. Let it sit undisturbed for 1 minute to allow the chocolate to soften, then whisk until completely smooth and glossy. Pour this rich ganache over your cooled ladyfinger crust, tilting and swirling the pan to create an even layer that reaches the edges. Working quickly before the ganache sets, arrange whole ladyfinger biscuits in a single layer across the ganache surface. Don’t soak them in coffee or espresso-the moisture from the tiramisu cheesecake Cheesecake Factory filling will soften them perfectly during baking. This hidden layer adds authentic tiramisu texture and flavor.
- This step is crucial for achieving that signature the Cheesecake Factory tiramisu cheesecake texture. In a large bowl or stand mixer, beat the 3 packages of room-temperature cream cheese on medium speed for 2-3 minutes until completely smooth with no lumps-scrape down the sides frequently. Gradually add 1 cup granulated sugar, beating until fluffy and well incorporated. Add 1 cup mascarpone cheese and continue beating until the mixture is creamy and uniform. In a small bowl, whisk together ¼ cup cornstarch, 2 teaspoons vanilla extract, and ¼ cup cooled brewed espresso until the cornstarch dissolves completely. Pour this coffee mixture into your cream cheese base and mix on low speed until just combined. Finally, add 2 large eggs one at a time, mixing on the lowest speed after each addition-this prevents incorporating too much air, which causes cracking. Mix only until the eggs disappear into the batter.
- Carefully pour the espresso-infused filling over your ladyfinger and ganache layers, filling the pan almost to the top-the filling will puff slightly during baking. Gently tap the pan on the counter 2-3 times to release any air bubbles. Place the springform pan on a baking sheet (to catch any potential drips) and bake at 350°F for exactly 45 minutes. The Cheesecake Factory tiramisu cheesecake recipe is done when the edges are slightly puffed and set with a light golden color, while a 3-inch circle in the center remains jiggly-it should wobble like gelatin when you gently shake the pan. This center will firm up during cooling. Turn off the oven, crack the door open slightly, and let the cheesecake sit inside for 15 minutes to prevent thermal shock and cracking. Remove and cool completely to room temperature on a wire rack (about 2 hours), then cover with plastic wrap and refrigerate for at least 4-6 hours or preferably overnight until fully set.
- Once your tiramisu cheesecake factory creation is completely chilled and set, prepare the whipped cream topping. In a clean, cold mixing bowl (placing it in the freezer for 10 minutes beforehand helps), combine 1¼ cups cold whipping cream, 1 tablespoon instant skim milk powder (this stabilizes the cream and prevents weeping), 1½ tablespoons granulated sugar, and a splash of vanilla extract. Beat on medium speed until soft peaks form, then increase to medium-high until stiff peaks develop-the cream should hold its shape when the beater is lifted but still look smooth and creamy, not grainy. Don’t overbeat or you’ll make butter. Remove your chilled cheesecake from the refrigerator and carefully release the springform pan sides. Using an offset spatula, spread the whipped cream evenly over the top, creating decorative swirls if desired, or transfer to a piping bag and pipe rosettes for an elegant presentation.
- Place cocoa powder in a fine-mesh sieve and gently tap it over the whipped cream topping, creating an even dusting that mimics the classic tiramisu the Cheesecake Factory appearance. For clean, professional slices, use a sharp knife dipped in hot water and wiped dry between each cut. The Cheesecake Factory tiramisu is best served chilled but not ice-cold-remove from the refrigerator 10-15 minutes before serving to allow the flavors to bloom. Each slice should reveal distinct layers: the ladyfinger crust, dark ganache, coffee-soaked ladyfingers, creamy espresso filling, and cloud-like topping.
Video
Notes
This Cheesecake Factory tiramisu cheesecake recipe represents the pinnacle of dessert fusion, combining Italian elegance with American indulgence in every luxurious layer. The interplay of coffee-infused cream cheese, delicate ladyfingers, bittersweet chocolate ganache, and billowy whipped cream creates a symphony of flavors and textures that rivals any restaurant version. Whether you’re a seasoned baker tackling this tiramisu cheesecake Cheesecake Factory masterpiece or an ambitious novice ready to impress, the detailed instructions and expert tips ensure your success. The beauty of this dessert lies not just in its stunning presentation but in how each component-from the espresso-soaked layers to the cocoa-dusted finish-works in perfect harmony to deliver an unforgettable experience worth every minute of preparation.
We’d love to hear how this recipe turns out for you! Give it a try, then drop a comment below to share your thoughts and tips with us.
Also, follow along on Pinterest and Youtube for more tasty updates. Your support and thoughts mean the world!
Looks Delicious
Thanks