
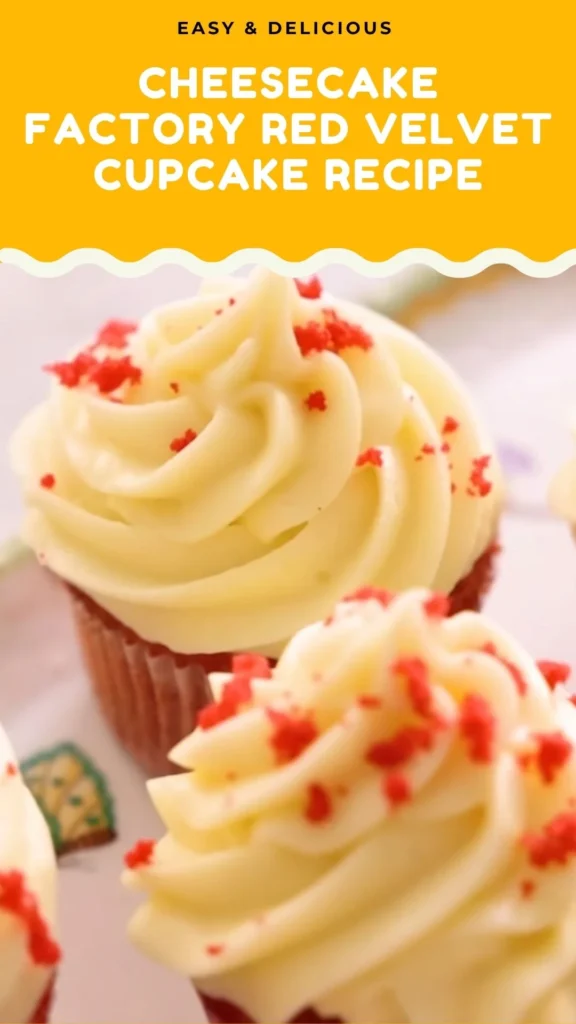
If you’ve ever been captivated by the Cheesecake Factory red velvet cupcake sitting elegantly in their dessert case, you already know these aren’t ordinary cupcakes. This Cheesecake Factory red velvet cupcake recipe recreates those iconic miniature masterpieces with their signature velvety crumb, brilliant crimson color, and cloud-like cream cheese frosting that’s become synonymous with dessert perfection.
Whether you’re craving those Cheesecake Factory mini red velvet cupcakes for a special celebration or simply want to bring restaurant-quality baking into your home kitchen, this recipe delivers the same luxurious texture and balanced flavors that make these treats unforgettable.
The secret lies in the reverse creaming method, perfect buttermilk tang, and that impossibly smooth frosting that defines Cheesecake Factory red velvet cupcakes everywhere.
What Does It Taste Like?
Cheesecake Factory red velvet cupcakes offer a sophisticated flavor experience that goes far beyond typical chocolate cake. The first bite reveals an incredibly tender, fine-textured crumb that melts on your tongue-soft as velvet, hence the name.
The subtle cocoa presence adds depth without overwhelming sweetness, while buttermilk contributes a gentle tang that keeps each bite interesting. The cake itself isn’t aggressively chocolate; instead, it’s a delicate balance of vanilla-forward sweetness with cocoa undertones and a hint of buttermilk brightness.
Then comes the cream cheese frosting-rich, tangy, and silky smooth with just enough sweetness to complement without cloying. The contrast between the moist, slightly acidic cake and the luxurious, buttery frosting creates a harmonious balance that explains why these Cheesecake Factory red velvet cupcake creations have achieved cult status.
Ingredients and Kitchen Utensils Lists
Ingredients
For the cupcakes (dry base):
- 1⅔ cups (200g) all-purpose flour
- 1 cup (200g) granulated sugar
- 1 tablespoon natural cocoa powder
- 1 teaspoon baking powder
- ¼ teaspoon baking soda
- ¼ teaspoon salt
- ¾ cup (170g) unsalted butter, room temperature, cut into tablespoon-sized pieces
For the cupcakes (wet mix):
- ¾ cup buttermilk
- 3 large eggs, room temperature
- 2 tablespoons vanilla extract
- Red food coloring (1 drop gel or several drops liquid for deep red)
For the cream cheese frosting:
- 1½ cups (340g / 3 sticks) unsalted butter, room temperature
- 16 oz (450g / 2 bricks) cream cheese, room temperature
- ~6 cups (720g) confectioner’s sugar, adjusted to taste
- 1 teaspoon vanilla extract
- 1-2 generous pinches salt
Kitchen Utensils
- Standard cupcake pans (2)
- 16 cupcake liners
- Stand mixer with paddle attachment (or hand mixer)
- Large mixing bowls (2-3)
- Fine-mesh sifter or sieve
- Liquid measuring cup
- Whisk
- Rubber spatula
- Ice cream scoop or ⅓ cup measure
- Cooling rack
- Piping bag with star tip (846 recommended)
- Toothpick for testing doneness
- Measuring cups and spoons
Preparation and Cooking Time with Serving
Prep Time: 20 minutes
Bake Time: 15-20 minutes
Cooling Time: 30 minutes
Frosting Time: 15 minutes
Total Time: 1 hour 20 minutes
Yield: 14-16 cupcakes
Difficulty Level: Intermediate
Recipe Instructions with Steps
Step 1: Prepare Your Workspace
Preheat your oven to 350°F (180°C) and position the rack in the center. Line two cupcake pans with 16 paper liners-this recipe yields between 14-16 Cheesecake Factory red velvet cupcakes depending on how generously you fill each liner. Ensure all your ingredients, particularly butter, eggs, and cream cheese, are at room temperature, which is crucial for achieving the signature smooth texture of the Cheesecake Factory red velvet cupcake recipe. Room temperature ingredients emulsify properly, creating that tender, fine crumb.
Step 2: Sift the Dry Ingredients
In your stand mixer bowl (or a large mixing bowl if using a hand mixer), sift together 1⅔ cups all-purpose flour, 1 cup granulated sugar, 1 tablespoon natural cocoa powder, 1 teaspoon baking powder, ¼ teaspoon baking soda, and ¼ teaspoon salt. Sifting is essential for red velvet because it removes lumps and aerates the dry ingredients, contributing to that characteristic velvety texture. Whisk the sifted ingredients together briefly to ensure even distribution before proceeding to the next step.
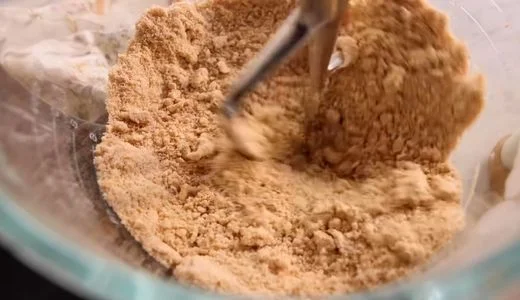
Step 3: Reverse Creaming Method
Add your ¾ cup of room-temperature butter (cut into tablespoon-sized pieces) directly into the bowl with your dry ingredients. Using the paddle attachment on low speed, mix until the butter is completely incorporated and the mixture resembles fine, damp sand-this typically takes 2-3 minutes. This reverse creaming method is the secret to Cheesecake Factory mini red velvet cupcakes achieving their incredibly tender, fine-textured crumb. Unlike traditional creaming where you beat butter and sugar first, this technique coats flour particles with fat, preventing gluten development and creating a more delicate cake structure.
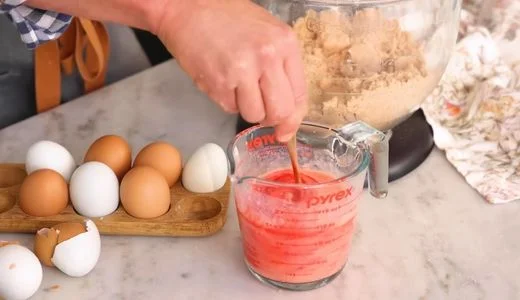
Step 4: Prepare the Wet Mixture
In a separate liquid measuring cup or medium bowl, whisk together ¾ cup buttermilk, 3 large room-temperature eggs, 2 tablespoons vanilla extract, and your red food coloring. For gel food coloring, one small drop is usually sufficient; for liquid coloring, you’ll need several drops to achieve that signature deep crimson hue. Make the liquid mixture a shade or two deeper than your desired final color, as the batter will dilute the vibrancy. The buttermilk’s acidity is crucial-it reacts with the baking soda and enhances the cocoa’s red undertones, contributing to the authentic Cheesecake Factory red velvet cupcake color and flavor.
Step 5: Combine Wet and Dry
With your mixer running on low speed, slowly pour the wet mixture into your sandy butter-flour mixture in a steady stream. This gradual incorporation prevents lumps and ensures even distribution. Once all the liquid is added and you no longer see dry streaks, stop the mixer and scrape down the sides and bottom of the bowl thoroughly with a rubber spatula. Mix again on medium speed for just 5-10 seconds to incorporate any missed ingredients and aerate the batter slightly. Be careful not to overmix at this stage, as it can develop gluten and make your Cheesecake Factory red velvet cupcakes tough rather than tender.
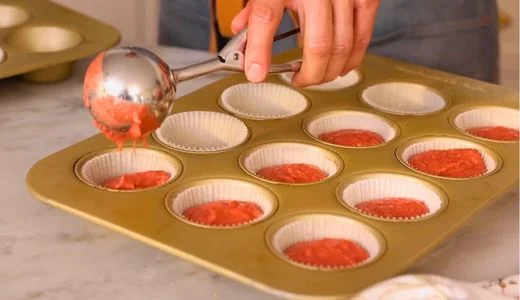
Step 6: Fill and Bake
Using an ice cream scoop or measuring cup, fill each cupcake liner about two-thirds full-this allows room for the cupcakes to rise without overflowing. The batter should be relatively thin and pourable, which is normal for this recipe. Place both pans in your preheated 350°F oven (if they don’t fit side-by-side, bake in batches). Bake for 15-20 minutes, checking at the 15-minute mark. The cupcakes are done when the tops spring back when lightly touched and a toothpick inserted into the center comes out with just a few moist crumbs-not wet batter. Avoid overbaking, as this dries out the delicate crumb.
Step 7: Cool Completely
Remove the cupcakes from the oven and let them rest in the pans for 5 minutes before transferring to a wire cooling rack. Allow them to cool completely-at least 30 minutes-before frosting. This cooling step is absolutely critical for the Cheesecake Factory red velvet cupcake recipe because frosting warm cupcakes will cause the cream cheese frosting to melt and slide off. If you’re in a hurry, you can place cooled cupcakes in the refrigerator for 15 minutes to expedite the process.
Step 8: Make the Cream Cheese Frosting
In a clean mixer bowl, beat 1½ cups of room-temperature butter on medium speed for about 2 minutes until it becomes light, fluffy, and pale in color. Add the 16 oz of room-temperature cream cheese (it must be soft; cold cream cheese creates lumps) and continue beating on medium speed for 1-2 minutes until perfectly smooth. Add 1-2 generous pinches of salt and 1 teaspoon vanilla extract, mixing briefly to incorporate.
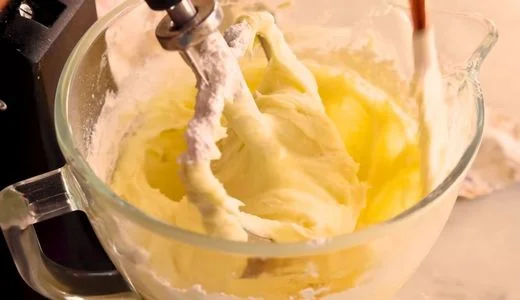
Step 9: Add Confectioner’s Sugar
Reduce mixer speed to low and gradually add the confectioner’s sugar 1-2 cups at a time, allowing each addition to incorporate before adding more. Once all 6 cups are added (you may need slightly less or more depending on desired consistency), scrape down the bowl thoroughly. Increase speed to medium-high and beat for 1-2 minutes until the frosting is “smooth as silk”-it should be spreadable yet hold stiff peaks. This frosting is what truly makes Cheesecake Factory red velvet cupcakes legendary: perfectly balanced between sweet and tangy, rich but not greasy, and impossibly smooth.
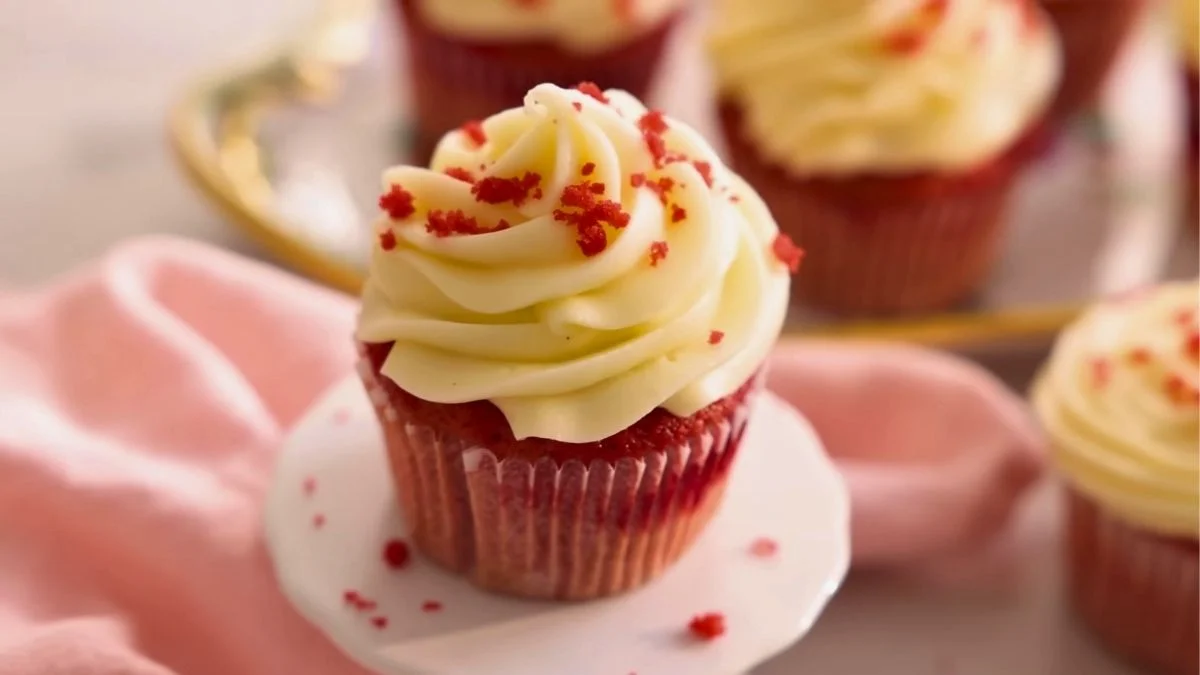
Step 10: Frost and Garnish
Fill a piping bag fitted with a large star tip (846 is ideal for that classic bakery swirl) with your cream cheese frosting. Pipe generous swirls onto each completely cooled cupcake, starting from the outside edge and working inward in a circular motion, finishing with a peak in the center. For an authentic Cheesecake Factory mini red velvet cupcakes presentation, sacrifice one cupcake by crumbling it into fine red crumbs, then sprinkle these decoratively over the frosted tops. This adds visual appeal and gives a hint of what’s inside. Refrigerate frosted cupcakes for 15 minutes to set the frosting before serving.

Customization and Pairing for Serving Ideas
1. Chocolate Ganache Drizzle Variation
Elevate your Cheesecake Factory red velvet cupcake presentation by adding a chocolate ganache drizzle over the cream cheese frosting. Melt 4 oz of semi-sweet chocolate with ¼ cup heavy cream, let it cool slightly until pourable but not hot, then drizzle artistically over frosted cupcakes using a spoon or piping bag with a small round tip. The bittersweet chocolate adds complexity and creates a stunning visual contrast against the white frosting and red crumbs, making these perfect for upscale events or Valentine’s Day celebrations.
2. Coffee or Espresso Pairing
The tangy cream cheese frosting and subtle cocoa notes in Cheesecake Factory red velvet cupcakes pair beautifully with coffee beverages. Serve alongside espresso, cappuccino, or a robust French press coffee for an afternoon treat. The coffee’s bitterness complements the frosting’s sweetness while enhancing the cupcake’s chocolate undertones. For an adult dessert party, consider pairing with Irish coffee or an espresso martini to create a sophisticated dessert and beverage experience.
3. Mini Cupcake Adaptation for Events
Transform this the Cheesecake Factory red velvet cupcake recipe into elegant bite-sized treats perfect for weddings, showers, or cocktail parties. Use mini cupcake pans lined with mini papers, fill only halfway, and bake for just 10-12 minutes. This recipe yields approximately 36-40 mini cupcakes. Pipe smaller frosting rosettes using a smaller star tip, and these adorable Cheesecake Factory mini red velvet cupcakes become perfect one-bite indulgences that allow guests to sample multiple desserts without overindulging.
4. Cream Cheese Filling Surprise
Create a luxurious filled version by preparing a simple cream cheese filling: beat 8 oz softened cream cheese with ¼ cup sugar and 1 egg until smooth. Fill cupcake liners one-third full with red velvet batter, add 1 tablespoon of cream cheese filling to the center, then top with more batter until two-thirds full. Bake as directed (possibly adding 1-2 minutes). This creates a delightful surprise center reminiscent of cheesecake itself, making your Cheesecake factory red velvet cupcake even more decadent.
5. More Cheesecake Factory Desserts to Explore
If you love the rich flavor of this Cheesecake Factory Red Velvet Cupcake Recipe, you should also try some of our other indulgent desserts. The creamy Creamy Carnivore Cheesecake Recipe is a must for cheesecake lovers who enjoy ultra-smooth, decadent textures. For a fruity and caramelized twist, our Cheesecake Factory Pineapple Upside Down Cheesecake Recipe brings tropical sweetness and classic cheesecake richness together beautifully. These desserts pair perfectly with homemade bakery-style treats and help you recreate the full Cheesecake Factory dessert experience at home.
6. Red Velvet Cupcake Trifle
Repurpose leftover or intentionally made Cheesecake Factory red velvet cupcakes into an impressive trifle. Crumble cupcakes into chunks, layer in a glass trifle bowl with extra cream cheese frosting (thinned slightly with milk to make it spreadable), fresh berries, and whipped cream. The individual layers showcase the beautiful red color while creating a completely different textural experience. This presentation feeds a crowd and makes a stunning centerpiece for buffet-style gatherings.
7. Seasonal Flavor Variations
While maintaining the base Cheesecake Factory red velvet cupcake recipe, customize for seasons by adjusting the frosting. Add 2 tablespoons of peppermint extract and crushed candy canes for winter holidays, incorporate orange zest for autumn, or fold in fresh lemon curd for spring. For Halloween, use black food coloring in the frosting for dramatic “black velvet” cupcakes. These variations honor the classic recipe while allowing you to create themed desserts for year-round celebrations.

Tips Section
1. Room Temperature Ingredients Are Non-Negotiable
The single most important factor in achieving the signature texture of the Cheesecake Factory red velvet cupcake recipe is using room-temperature ingredients. Butter, eggs, buttermilk, and especially cream cheese should sit out for 60-90 minutes before baking. Cold ingredients don’t emulsify properly, leading to dense cupcakes and lumpy frosting. Cold butter won’t incorporate evenly during reverse creaming, cold eggs can cause batter to curdle, and cold cream cheese creates an irreversibly grainy frosting. Plan ahead and set ingredients out before you start, or quick-temper eggs by placing them in warm water for 5 minutes.
2. Natural vs. Dutch-Process Cocoa Matters
Traditional Cheesecake Factory red velvet cupcakes use natural (non-alkalized) cocoa powder because it’s acidic and reacts with baking soda to enhance the reddish hue and create a tender crumb. Dutch-process cocoa has been alkalized, neutralizing its acidity, which affects both the chemical reactions and color development. While you can use Dutch-process if that’s what you have, natural cocoa produces more authentic results. The amount is deliberately minimal-just 1 tablespoon-because red velvet is meant to be subtly chocolate-flavored, not a chocolate cake dyed red.
3. Food Coloring Strategy for Vibrant Results
Achieving that iconic deep crimson requires the right approach to food coloring. Gel food coloring is superior to liquid because it’s more concentrated-one tiny drop often suffices without adding excess moisture to your batter. If using liquid coloring, you’ll need significantly more (sometimes a full teaspoon), which can slightly thin your batter. Add coloring to wet ingredients before combining with dry to ensure even distribution. Always make the unbaked batter a shade darker than desired, as baking slightly dulls the vibrancy. For completely natural coloring, beet powder works but produces a more brownish-red tone.
4. The Reverse Creaming Method Explained
Unlike traditional cake mixing where you cream butter and sugar together first, this Cheesecake Factory red velvet cupcake recipe uses reverse creaming-adding butter to dry ingredients first. This technique coats flour particles with fat before liquid is introduced, minimizing gluten development and resulting in an incredibly tender, fine-textured crumb with a tighter, more velvety structure. Don’t rush this step; mix on low speed until the mixture truly resembles damp sand with no visible butter chunks. This method is also more foolproof than traditional creaming, producing consistent results even for less experienced bakers.
5. Achieving Silky-Smooth Frosting
The hallmark of Cheesecake Factory mini red velvet cupcakes is that impossibly smooth, pipeable frosting. Start by beating butter alone until it’s pale and fluffy-this incorporates air and ensures no butter lumps remain. When adding cream cheese, use the paddle attachment (not the whisk), which blends without incorporating too much air that can cause bubbles in your frosting. Beat just until smooth; overbeating can warm the frosting, making it soupy. If your frosting seems too soft to pipe, refrigerate for 15-20 minutes, then re-whip briefly. Too stiff? Add 1 tablespoon of milk or cream and beat until smooth.
6. Testing for Perfect Doneness
Red velvet cupcakes can be tricky to test because their red color makes visual browning cues unreliable. Start checking at 15 minutes using the gentle touch test: lightly press the top center of a cupcake with your fingertip-if it springs back immediately leaving no indentation, it’s done. A toothpick inserted in the center should come out with a few moist crumbs but no wet batter. Remember that Cheesecake Factory red velvet cupcakes continue cooking slightly from residual heat after removal from the oven, so slightly underbaked is better than overbaked. Overbaking creates dry, crumbly cupcakes that lose that characteristic velvet texture.
7. Troubleshooting Density and Rise
If your cupcakes are dense or sink, it’s usually due to expired leavening agents or overmixing. Overmixing develops too much gluten, making the “velvet” crumb tough and rubbery. Ensure your baking soda is fresh and stop mixing the moment the last streaks of flour disappear to keep the structure light and airy.

Storage and Reheating Guidance
Store Cheesecake Factory red velvet cupcakes in an airtight container in the refrigerator for up to 4 days due to the cream cheese frosting. Allow cupcakes to come to room temperature for 30 minutes before serving for optimal flavor and texture. These cupcakes don’t require reheating-they’re meant to be enjoyed at room temperature when the frosting is soft and the cake is at its most tender and flavorful.
Common Queries and FAQs Section
Here, we’ve got you covered with some common questions that people often ask
Q: Can I make this recipe without buttermilk?
A: While buttermilk is crucial for authentic Cheesecake Factory red velvet cupcake flavor and texture, you can create a substitute by adding 2¼ teaspoons of white vinegar or lemon juice to ¾ cup regular milk and letting it sit for 5 minutes until curdled. This creates similar acidity for the chemical reactions, though true buttermilk provides superior tang and tenderness. For best results, keep real buttermilk on hand-it freezes beautifully for up to 3 months.
Q: Why did my cupcakes turn out dense instead of fluffy?
A: Dense the Cheesecake Factory red velvet cupcake recipe results usually stem from overmixing after adding wet ingredients (developing too much gluten), using cold ingredients that don’t emulsify properly, or inaccurate measurements. Ensure you’re measuring flour correctly-spoon it into measuring cups and level off rather than scooping directly, which compacts flour and adds too much. Mix on low speed and stop as soon as ingredients are just combined. The reverse creaming method helps prevent density when done correctly.
Q: Can I use this recipe to make a layer cake instead of cupcakes?
A: Absolutely! This Cheesecake Factory red velvet cupcakes batter works beautifully for layer cakes. Divide the batter between two greased and floured 8-inch or 9-inch round cake pans and bake at 350°F for 25-30 minutes until a toothpick comes out clean. Cool completely, then layer with cream cheese frosting between layers and frost the outside. You’ll have enough frosting for a two-layer cake with generous coverage.
Q: My frosting turned out too sweet-how can I fix it?
A: Cream cheese frosting sweetness is adjustable. If your frosting is too sweet, add more cream cheese (2-4 oz), an additional pinch of salt, or 1-2 teaspoons of lemon juice, then beat until smooth. These additions balance sweetness with tang. Alternatively, next time reduce confectioner’s sugar to 4-5 cups instead of 6. Remember that Cheesecake Factory mini red velvet cupcakes frosting should be noticeably tangy to complement the sweet cake.
Q: Can I make these cupcakes gluten-free?
A: Yes! Substitute the all-purpose flour with a 1:1 gluten-free baking flour blend (brands like Bob’s Red Mill or King Arthur work well). Ensure your blend contains xanthan gum or add ½ teaspoon yourself to help with structure. The reverse creaming method works particularly well for gluten-free baking since it minimizes gluten development concerns. The texture will be slightly different but still delicious and tender.
Q: Why are my cupcakes sticking to the liners?
A: Cupcakes stick to liners when they’re too moist, haven’t cooled completely, or when using poor-quality liners. Always let Cheesecake Factory red velvet cupcake creations cool completely before attempting to peel liners. Store cupcakes in a container with slight air circulation rather than sealed completely airtight, which can create condensation. Invest in quality foil-lined or grease-resistant baking cups, or lightly spray paper liners with non-stick spray before filling.
Q: How far in advance can I frost these cupcakes?
A: You can frost the Cheesecake Factory red velvet cupcake recipe cupcakes up to 24 hours before serving. Store frosted cupcakes in a single layer in an airtight container in the refrigerator. For best appearance, avoid stacking or covering tightly, which can smash the frosting. If making further ahead, freeze unfrosted cupcakes and frost the day of your event. Frosting holds up well for transport if kept cold, making these excellent for potlucks or parties.
Cheesecake Factory Red Velvet Cupcake Recipe
Ingredients
Equipment
Method
- Preheat your oven to 350°F (180°C) and position the rack in the center. Line two cupcake pans with 16 paper liners-this recipe yields between 14-16 Cheesecake Factory red velvet cupcakes depending on how generously you fill each liner. Ensure all your ingredients, particularly butter, eggs, and cream cheese, are at room temperature, which is crucial for achieving the signature smooth texture of the Cheesecake Factory red velvet cupcake recipe. Room temperature ingredients emulsify properly, creating that tender, fine crumb.
- In your stand mixer bowl (or a large mixing bowl if using a hand mixer), sift together 1⅔ cups all-purpose flour, 1 cup granulated sugar, 1 tablespoon natural cocoa powder, 1 teaspoon baking powder, ¼ teaspoon baking soda, and ¼ teaspoon salt. Sifting is essential for red velvet because it removes lumps and aerates the dry ingredients, contributing to that characteristic velvety texture. Whisk the sifted ingredients together briefly to ensure even distribution before proceeding to the next step.
- Add your ¾ cup of room-temperature butter (cut into tablespoon-sized pieces) directly into the bowl with your dry ingredients. Using the paddle attachment on low speed, mix until the butter is completely incorporated and the mixture resembles fine, damp sand-this typically takes 2-3 minutes. This reverse creaming method is the secret to Cheesecake Factory mini red velvet cupcakes achieving their incredibly tender, fine-textured crumb. Unlike traditional creaming where you beat butter and sugar first, this technique coats flour particles with fat, preventing gluten development and creating a more delicate cake structure.
- In a separate liquid measuring cup or medium bowl, whisk together ¾ cup buttermilk, 3 large room-temperature eggs, 2 tablespoons vanilla extract, and your red food coloring. For gel food coloring, one small drop is usually sufficient; for liquid coloring, you’ll need several drops to achieve that signature deep crimson hue. Make the liquid mixture a shade or two deeper than your desired final color, as the batter will dilute the vibrancy. The buttermilk’s acidity is crucial-it reacts with the baking soda and enhances the cocoa’s red undertones, contributing to the authentic Cheesecake Factory red velvet cupcake color and flavor.
- With your mixer running on low speed, slowly pour the wet mixture into your sandy butter-flour mixture in a steady stream. This gradual incorporation prevents lumps and ensures even distribution. Once all the liquid is added and you no longer see dry streaks, stop the mixer and scrape down the sides and bottom of the bowl thoroughly with a rubber spatula. Mix again on medium speed for just 5-10 seconds to incorporate any missed ingredients and aerate the batter slightly. Be careful not to overmix at this stage, as it can develop gluten and make your Cheesecake Factory red velvet cupcakes tough rather than tender.
- Using an ice cream scoop or measuring cup, fill each cupcake liner about two-thirds full-this allows room for the cupcakes to rise without overflowing. The batter should be relatively thin and pourable, which is normal for this recipe. Place both pans in your preheated 350°F oven (if they don’t fit side-by-side, bake in batches). Bake for 15-20 minutes, checking at the 15-minute mark. The cupcakes are done when the tops spring back when lightly touched and a toothpick inserted into the center comes out with just a few moist crumbs-not wet batter. Avoid overbaking, as this dries out the delicate crumb.
- Remove the cupcakes from the oven and let them rest in the pans for 5 minutes before transferring to a wire cooling rack. Allow them to cool completely-at least 30 minutes-before frosting. This cooling step is absolutely critical for the Cheesecake Factory red velvet cupcake recipe because frosting warm cupcakes will cause the cream cheese frosting to melt and slide off. If you’re in a hurry, you can place cooled cupcakes in the refrigerator for 15 minutes to expedite the process.
- In a clean mixer bowl, beat 1½ cups of room-temperature butter on medium speed for about 2 minutes until it becomes light, fluffy, and pale in color. Add the 16 oz of room-temperature cream cheese (it must be soft; cold cream cheese creates lumps) and continue beating on medium speed for 1-2 minutes until perfectly smooth. Add 1-2 generous pinches of salt and 1 teaspoon vanilla extract, mixing briefly to incorporate.
- Reduce mixer speed to low and gradually add the confectioner’s sugar 1-2 cups at a time, allowing each addition to incorporate before adding more. Once all 6 cups are added (you may need slightly less or more depending on desired consistency), scrape down the bowl thoroughly. Increase speed to medium-high and beat for 1-2 minutes until the frosting is “smooth as silk”-it should be spreadable yet hold stiff peaks. This frosting is what truly makes Cheesecake Factory red velvet cupcakes legendary: perfectly balanced between sweet and tangy, rich but not greasy, and impossibly smooth.
- Fill a piping bag fitted with a large star tip (846 is ideal for that classic bakery swirl) with your cream cheese frosting. Pipe generous swirls onto each completely cooled cupcake, starting from the outside edge and working inward in a circular motion, finishing with a peak in the center. For an authentic Cheesecake Factory mini red velvet cupcakes presentation, sacrifice one cupcake by crumbling it into fine red crumbs, then sprinkle these decoratively over the frosted tops. This adds visual appeal and gives a hint of what’s inside. Refrigerate frosted cupcakes for 15 minutes to set the frosting before serving.
Video
Notes
This Cheesecake Factory red velvet cupcake recipe brings the elegance and luxury of restaurant-quality desserts into your home kitchen with achievable techniques and readily available ingredients. The signature tender, velvety crumb paired with impossibly smooth cream cheese frosting creates the same show-stopping experience that makes Cheesecake Factory red velvet cupcakes so beloved. Whether you’re baking for celebrations, practicing your pastry skills, or simply indulging a craving for those iconic Cheesecake Factory mini red velvet cupcakes, this recipe delivers consistent, impressive results. With the customization options and expert tips provided, you can master this classic and make it your signature dessert. Happy baking!
We’d love to hear how this recipe turns out for you! Give it a try, then drop a comment below to share your thoughts and tips with us.
Also, follow along on Pinterest and Youtube for more tasty updates. Your support and thoughts mean the world!
Looks Delicious