
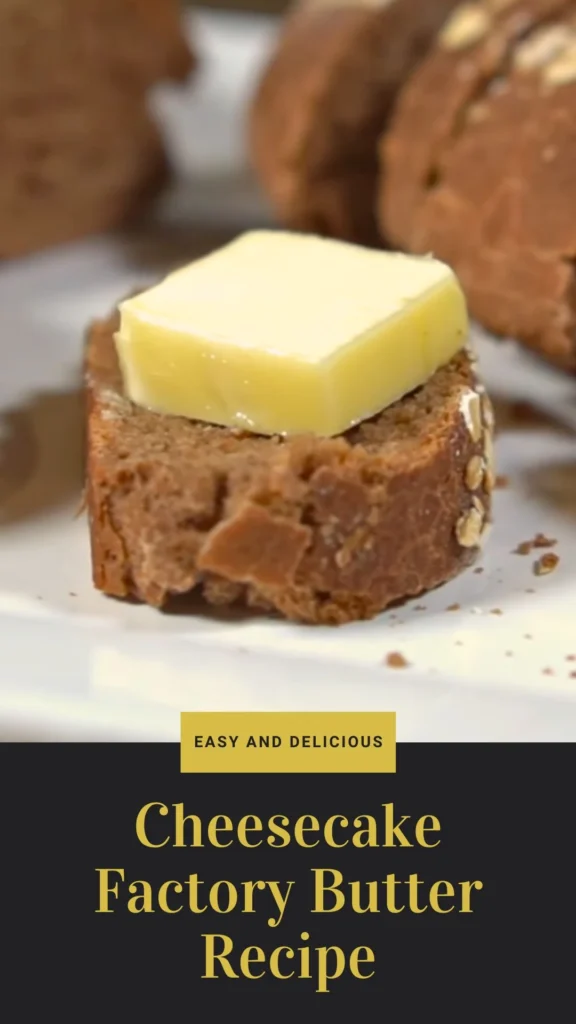
The moment that warm, crusty bread basket arrives at your table with a side of whipped, creamy Cheesecake Factory butter, you know you’re in for something special. That impossibly smooth, velvety spread has become almost as famous as the restaurant’s towering desserts.
While many diners wonder about the Cheesecake Factory butter brand or secret ingredient, the truth is even better: you can create this luxurious Cheesecake Factory butter for bread right in your own kitchen with just one simple ingredient-heavy cream.
This Cheesecake Factory butter recipe teaches you the traditional churning method that transforms ordinary whipping cream into extraordinary, restaurant-quality butter that’s fresher, creamier, and more flavorful than anything you’ll find at the grocery store. Once you learn how to make Cheesecake Factory butter, you’ll never look at store-bought the same way again.
What Does It Taste Like?
Homemade Cheesecake Factory butter delivers a remarkably fresh, clean dairy flavor that’s noticeably sweeter and more delicate than commercial butter. The texture is what truly sets it apart-impossibly smooth, creamy, and almost mousse-like when whipped, spreading effortlessly across warm bread without tearing.
Unlike the sharp, sometimes salty tang of store-bought butter, this version tastes purely of fresh cream with subtle grassy, milky notes that reflect high-quality dairy. The color is naturally pale yellow to ivory white, lacking the artificial coloring often added to supermarket brands.
When served at room temperature like the Cheesecake Factory butter for bread, it becomes silky and spreadable with a velvety mouthfeel that melts instantly on your tongue, coating your palate with rich butterfat that enhances rather than overwhelms the flavor of fresh bread. Pair it with our Cheesecake Factory Mashed Potato Recipe, Texas Roadhouse Buttered Corn, or Longhorn Steakhouse Potato Soup for the ultimate rich and comforting meal experience.
Ingredients and Kitchen Utensils Lists
Ingredients
For basic homemade butter:
- 2-4 cups cold heavy whipping cream (36-42% fat content; preferably 40%+ for best results)
- 2 cups (1 pint) yields approximately ½ pound butter
- 4 cups (1 quart) yields approximately 1 pound butter
- Ice-cold water (for rinsing)
- Salt (optional, to taste, for salted butter)
Optional flavor additions:
- Fresh herbs (rosemary, thyme, chives)
- Roasted garlic
- Honey or maple syrup
- Cinnamon and sugar
Kitchen Utensils
- Stand mixer with whisk attachment (or hand mixer/food processor)
- Large mixing bowl
- Separate bowl for ice water
- Fine mesh strainer or cheesecloth
- Rubber spatula or wooden spoon
- Parchment paper or butter molds
- Airtight storage container
- Small jar for collecting buttermilk
Preparation and Cooking Time with Serving
Prep Time: 5 minutes
Active Churning Time: 10-15 minutes
Rinsing & Finishing Time: 5-10 minutes
Total Time: 20-30 minutes
Yield: ½ pound butter + 1 cup buttermilk (from 2 cups cream)
Difficulty Level: Easy (beginner-friendly)
Recipe Instructions with Steps
Step 1: Prepare Everything Cold
The foundation of perfect Cheesecake Factory butter begins with temperature. Remove your heavy whipping cream from the refrigerator only when you’re ready to begin-it should be thoroughly chilled, ideally 35-40°F. Check the label to ensure your cream has at least 36% fat content, though 40% or higher produces superior results with better yield and creamier texture. If possible, chill your mixer bowl and whisk attachment in the freezer for 10-15 minutes before starting. Cold temperatures help the butterfat molecules separate cleanly from the liquid buttermilk, creating a smoother final product. Fill a separate bowl with ice water and set it aside-you’ll need this for the crucial rinsing step later.
Step 2: Start Whipping the Cream
Pour your cold heavy cream into the chilled mixer bowl, filling it no more than halfway to allow room for expansion. Attach the whisk attachment securely to your stand mixer. Begin mixing on low speed (setting 4-5 on most stand mixers) to prevent splattering. The cream will initially remain liquid and start coating the sides of the bowl. After about 1-2 minutes on low speed, you can gradually increase to medium speed as the cream begins to thicken. If you’re using a hand mixer, start on the lowest setting and work your way up. This gradual acceleration prevents a creamy mess while ensuring even incorporation of air into the fat molecules-an essential step in learning how to make Cheesecake Factory butter.
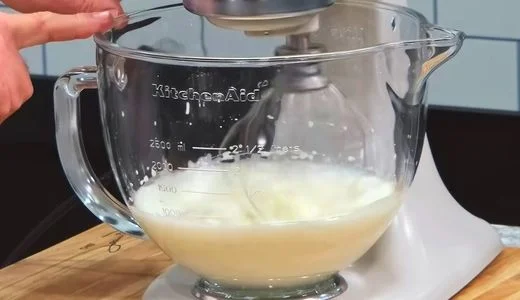
Step 3: Watch the Transformation Stages
Over the next 5-10 minutes, you’ll witness a fascinating culinary transformation. First, the cream reaches soft peaks-this is still whipped cream territory, perfect for desserts. Continue whipping past this stage. The mixture will progress to stiff peaks, becoming thick, glossy, and holding its shape firmly. Don’t stop here-you’re “over-whipping” intentionally. Keep going and the texture will suddenly turn grainy and almost powdery-looking, taking on a distinctly yellowish hue. You’ll notice it starts looking lumpy and “pattery,” losing that smooth whipped cream appearance. This is exactly what you want for Cheesecake Factory butter recipe success. The transformation from whipped cream to butter happens surprisingly fast, often within seconds, so stay attentive.
Step 4: The Big Break-Separation
Suddenly, and it truly is sudden, the mixture will “break.” You’ll see liquid (buttermilk) pooling at the bottom of the bowl while solid yellow clumps of butterfat form and cling to the whisk and bowl sides. The sound changes too-from a thick, heavy whooshing to a more splashy, sloshing noise as the buttermilk separates. When you see this clear separation with buttermilk sloshing around distinct butter solids, reduce your mixer speed to low or turn it off completely to avoid splashing buttermilk everywhere. The exact timing varies based on cream fat percentage and mixer power-higher fat cream and more powerful mixers work faster. For this Cheesecake Factory butter, the separation typically occurs between 7-12 minutes of total mixing time.
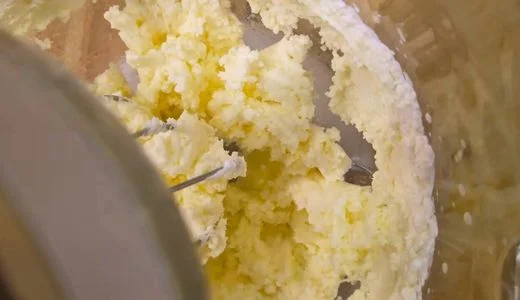
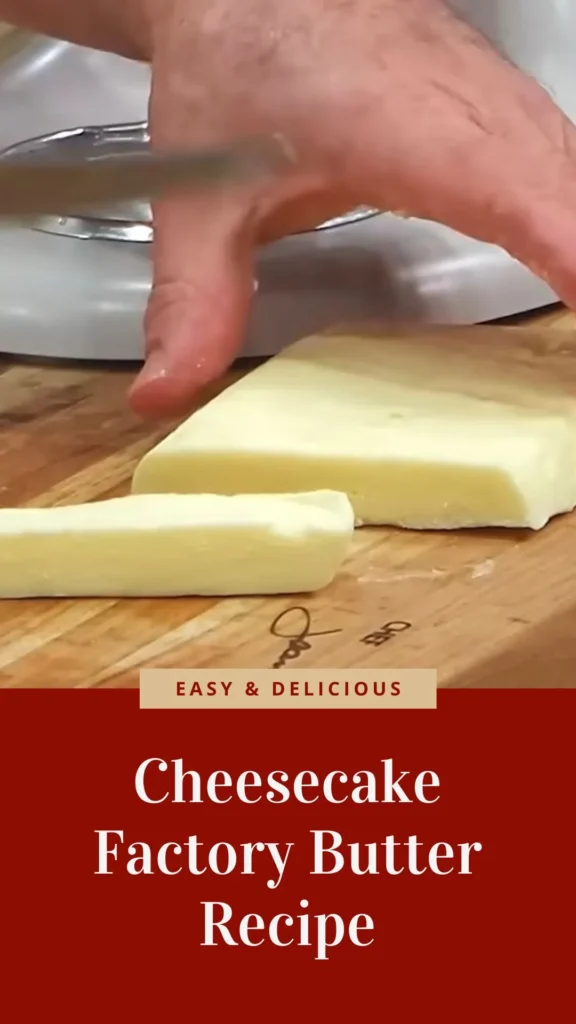
Step 5: Collect the Butter Solids
Stop the mixer completely once separation is clear. Using a rubber spatula, carefully scrape the butter solids from the whisk attachment and bowl sides. The butter may be in large chunks or smaller clumps-gather it all together, pressing it into a cohesive mass with your hands or the back of a spatula. Don’t worry if it looks rough at this stage; you’re not finished yet. Work the butter mass gently to express as much buttermilk as possible, squeezing it like a sponge. Pour the drained buttermilk through a fine mesh strainer into a jar for storage-this precious byproduct is perfect for pancakes, biscuits, mashed potatoes, salad dressings, and baking. Never discard it! The buttermilk will have a tangy, cultured flavor that’s far superior to most store-bought versions.
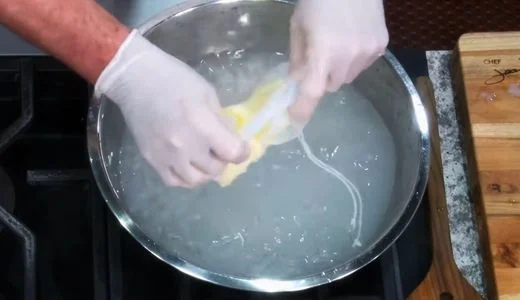
Step 6: The Critical Rinsing Process
This step is what separates mediocre homemade butter from exceptional Cheesecake Factory butter for bread that lasts. Place your butter mass in a clean bowl and pour ice-cold water over it, completely submerging the butter. Using your hands, a spatula, or wooden spoon, knead, press, and fold the butter in the cold water. You’re washing out residual buttermilk, which contains milk solids that cause butter to spoil quickly. The water will quickly turn cloudy and milky. Drain this cloudy water completely. Repeat the process: add fresh ice-cold water, knead the butter, watch the water turn cloudy, and drain. Continue this rinsing cycle 2-4 times until the water remains mostly clear after kneading. This thorough rinsing is non-negotiable-it extends your butter’s shelf life from days to weeks in the refrigerator, or months in the freezer.
Step 7: Final Press and Seasoning
Once your rinse water runs clear, give the butter a final, firm pressing to remove all excess water. Work it with your hands or press it against the side of the bowl with a spatula, squeezing out every drop of moisture you can. The butter should feel firm, smooth, and cohesive. At this point, if you want salted butter like the Cheesecake Factory butter, work in a small amount of fine sea salt or flaky salt to taste. Start with just a pinch (⅛ teaspoon per ½ pound butter) and knead it in thoroughly, then taste and adjust. Homemade butter is naturally milder and paler than commercial butter, so season gradually. For compound butter variations, this is the perfect time to fold in minced fresh herbs, roasted garlic, honey, cinnamon-sugar, or other flavorings.
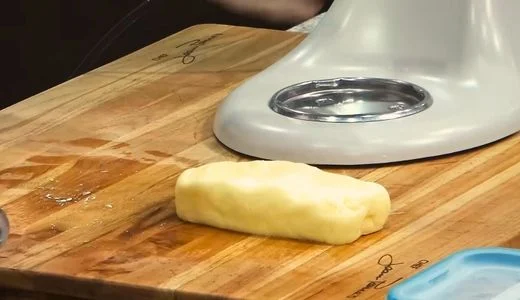
Step 8: Shape and Store
Shape your finished Cheesecake Factory butter recipe creation however you prefer. You can form it into rustic pats, roll it into logs using parchment paper (like commercial butter sticks), press it into decorative butter molds, or simply transfer it to an airtight container. For the authentic restaurant presentation, whip the butter briefly with a hand mixer or fork to incorporate a bit of air, creating that signature fluffy, spreadable texture. Line your storage container with parchment paper to prevent sticking. Store in the refrigerator where it will keep for 3-4 weeks thanks to your thorough rinsing, or freeze for 6-12 months wrapped tightly in parchment and placed in a freezer bag. Properly stored, frozen butter maintains quality for extended periods-some sources claim years, though 6-12 months is more practical for optimal flavor.
Customization and Pairing for Serving Ideas
1. Classic Whipped Presentation
To achieve the exact texture of Cheesecake Factory butter for bread, bring your finished butter to room temperature (about 30 minutes on the counter). Transfer to a mixing bowl and whip with a hand mixer on medium speed for 1-2 minutes, adding 1-2 tablespoons of heavy cream if needed to achieve that cloud-like, spreadable consistency. This aerated version spreads effortlessly on warm bread without tearing and creates an elegant presentation in a serving crock. The light, fluffy texture makes guests feel indulged while actually using less butter per serving than solid spreads.
2. Herb Garden Compound Butter
Elevate your Cheesecake Factory butter into a gourmet compound butter by folding in 2 tablespoons minced fresh herbs per ½ pound butter. Try classic combinations like rosemary-thyme for rustic breads, chives-parsley for dinner rolls, or basil-oregano for Italian cuisine. Add a teaspoon of lemon zest for brightness. These herb butters transform simple bread into something extraordinary and work beautifully melted over grilled steaks, roasted vegetables, or baked potatoes. Roll into logs using parchment paper, refrigerate until firm, then slice into decorative rounds for serving.
3. Sweet Breakfast Butter Variations
Create morning magic by transforming your homemade butter into sweet spreads perfect for pancakes, waffles, toast, and muffins. Mix ½ pound softened butter with 2 tablespoons honey and ½ teaspoon cinnamon for honey-cinnamon butter. Try maple-pecan by adding 2 tablespoons pure maple syrup and 2 tablespoons finely chopped toasted pecans. For berry butter, fold in 3 tablespoons fruit preserves (strawberry, raspberry, or blueberry). These sweet variations pair beautifully with the restaurant’s famous brown bread or any breakfast pastry.
4. Garlic Bread Perfection
Make restaurant-quality garlic bread by creating roasted garlic butter. Roast a whole head of garlic until caramelized and soft, squeeze out the cloves, mash into a paste, and blend with ½ pound butter along with 1 tablespoon minced fresh parsley and a pinch of red pepper flakes. This Cheesecake Factory butter recipe variation spreads beautifully on sliced baguette or ciabatta before toasting. The roasted garlic is mellow and sweet rather than harsh, creating depth without overwhelming the butter’s natural flavor. Perfect for Italian meals or as an appetizer.
5. International Flavor Profiles
Explore global cuisines by creating culturally inspired compound butters. Make French café de Paris butter with shallots, capers, anchovies, and herbs. Try Mexican chipotle-lime butter by mixing in chipotle powder, lime zest, and cilantro-perfect for corn on the cob or grilled proteins. Create Middle Eastern za’atar butter combining the spice blend with lemon juice. Japanese miso butter blends white miso paste into softened butter for umami richness on vegetables and seafood. These variations showcase how versatile how to make Cheesecake Factory butter techniques can be across world cuisines.
6. The Complete Bread Basket Experience
Recreate the full Cheesecake Factory butter experience at home by pairing your butter with a variety of artisan breads. Serve your whipped butter in a crock at room temperature alongside warm sourdough, multigrain, pumpernickel, and the restaurant’s signature brown bread (which you can find copycat recipes for online). Include both salted and unsalted versions so guests can choose. Add small butter knives or spreaders, and consider providing flavored salts or flaky sea salt on the side so diners can customize their experience.
7. Butter Board Entertaining
Transform your homemade Cheesecake Factory butter into a stunning centerpiece by creating a butter board-a trendy appetizer perfect for entertaining. Spread softened butter across a wooden board or marble slab, creating swirls and peaks with the back of a spoon. Top with flaky sea salt, edible flowers, honey drizzle, crushed pistachios, dried fruit, fresh herbs, or cracked black pepper. Arrange various breads, crackers, and crudités around the edges. This interactive presentation encourages guests to scrape butter directly onto their bread, creating a memorable shared experience that highlights your butter-making skills.
Tips Section
1. Cream Quality and Fat Content Matter
The secret to achieving authentic Cheesecake Factory butter texture and flavor starts with your cream selection. Always choose heavy whipping cream with the highest fat percentage available-40% or higher is ideal, though 36% (the minimum for “heavy cream” labeling) works adequately. Higher fat content yields more butter per cup of cream and creates a richer, creamier final product. Avoid “whipping cream” (30-35% fat) or ultra-pasteurized cream when possible, as these produce less butter and sometimes struggle to separate properly. Look for cream from grass-fed cows if available-it contains more beta-carotene, giving your butter a naturally deeper yellow color and more complex flavor. Organic cream often tastes cleaner and fresher, though standard heavy cream produces excellent results. The fresher the cream, the sweeter and more delicate your finished butter will taste.
2. Understanding the Separation Process
The transformation from cream to Cheesecake Factory butter recipe butter happens through mechanical agitation that ruptures the fat globule membranes in cream. Initially, whipping incorporates air into the cream’s structure, creating whipped cream. Continued agitation causes these air-filled fat globules to collide, stick together, and eventually coalesce into larger masses. When enough fat globules join together, they can no longer stay suspended in the liquid-this is “the break” where butterfat separates from buttermilk. This process typically takes 7-12 minutes with a stand mixer, but variables affect timing: cream temperature (colder takes slightly longer but separates cleaner), fat percentage (higher fat breaks faster), mixer power (stronger motors work quicker), and quantity (larger batches may take longer). Don’t get discouraged if your first attempt takes 15 minutes-each batch teaches you to recognize the visual and auditory cues that signal imminent separation.
3. The Rinsing Step Cannot Be Skipped
Many home cooks are tempted to skip the tedious rinsing process when learning how to make Cheesecake Factory butter, but this step is absolutely critical for two reasons: shelf life and flavor. Buttermilk contains milk sugars (lactose) and proteins (casein) that spoil rapidly, causing butter to develop off-flavors and rancidity within days. Thorough rinsing removes these milk solids, extending refrigerated shelf life from 3-5 days to 3-4 weeks, and frozen storage from weeks to months. Additionally, residual buttermilk can make your butter taste slightly sour or “cheesy” as it ages-not the clean, sweet flavor you want. The water temperature matters too: ice-cold water keeps the butter firm during kneading, preventing it from becoming greasy or melting. Lukewarm water causes the butter to soften and lose structure, making it harder to remove all the buttermilk. Plan for 3-5 rinses until water runs clear, and don’t rush this crucial step.
4. Salting Strategy for Perfect Flavor
Commercial Cheesecake Factory butter brand products are carefully salted to enhance flavor and extend shelf life-salt acts as a preservative. When making your own Cheesecake Factory butter for bread, add salt after rinsing and water removal, never before. Start conservatively with just ⅛ teaspoon fine sea salt per ½ pound butter, knead it in thoroughly, then taste. You can always add more, but you can’t remove excess salt. Homemade butter tastes milder and sweeter than store-bought, so it needs less seasoning than you might expect. For the fluffiest, most evenly seasoned result, dissolve your salt in 1-2 teaspoons of water before incorporating it-this ensures even distribution without undissolved crystals. If you prefer unsalted butter for baking or want maximum versatility, skip salt entirely and add it to individual portions as needed. Consider keeping both salted and unsalted versions on hand for different culinary applications.
5. Equipment Alternatives and Troubleshooting
While a stand mixer makes creating Cheesecake Factory butter effortless, you have options if you don’t own one. A hand mixer works perfectly-expect to add 3-5 minutes to the process, and be prepared for an arm workout. Food processors work surprisingly well and sometimes faster than mixers due to the blade’s cutting action, though they can be messier when separation occurs. For a truly traditional experience, you can make butter in a jar: fill a mason jar halfway with cream, seal tightly, and shake vigorously for 10-20 minutes until separation occurs (great for entertaining kids). If your butter isn’t separating after 15 minutes of mixing, troubleshoot these common issues: cream wasn’t cold enough (refrigerate 30 minutes and try again), fat content too low (add 2-4 tablespoons of additional heavy cream), or you stopped just before separation (keep going-it happens suddenly). If butter seems greasy or won’t firm up, your cream or kitchen was too warm; refrigerate the butter mass for 15 minutes before continuing.
6. Saving and Using the Buttermilk Byproduct
When you make Cheesecake Factory butter, you’re actually creating two valuable products: butter and true buttermilk. Unlike the cultured buttermilk sold in stores (which is fermented low-fat milk), this traditional buttermilk is the liquid left after churning cream-it’s thinner, sweeter, and less tangy, but still incredibly useful. Store it in an airtight container in the refrigerator for up to 10 days. Use it in pancake and waffle batters for tender texture, add it to mashed potatoes for creaminess, incorporate it into salad dressings and smoothies, or substitute it for regular milk in baking recipes. The slight acidity tenderizes baked goods and adds subtle tang to savory dishes. If you notice sediment settling at the bottom, simply shake before using. Two cups of cream yields approximately one cup of buttermilk, so you’ll accumulate a meaningful quantity from regular butter-making sessions.
7. Storage Best Practices for Maximum Freshness
Proper storage transforms your Cheesecake Factory butter recipe creation from a weekend project into a long-term staple. For refrigerator storage (3-4 weeks), wrap butter tightly in parchment paper, then place in an airtight container or zip-top bag to prevent it from absorbing refrigerator odors-butter readily picks up flavors from other foods. Keep it in the coldest part of your fridge, typically the back of a shelf, not the butter compartment in the door where temperature fluctuates. For room temperature serving butter (the restaurant-style approach), keep a small portion in a butter crock or covered dish, changing it every 2-3 days and keeping the main supply refrigerated. For long-term storage, freeze butter wrapped in parchment, then placed in a freezer bag with air pressed out-it keeps 6-12 months at peak quality. Freeze in portions (½ pound sticks or shaped pats) so you can thaw only what you need. Thaw frozen butter overnight in the refrigerator, never at room temperature where condensation can make it watery.
Storage and Reheating Guidance
Store Cheesecake Factory butter wrapped in parchment paper inside an airtight container in the refrigerator for 3-4 weeks, or freeze for 6-12 months. Keep a small serving portion at room temperature in a covered butter dish for 2-3 days for easy spreading. No reheating needed-simply bring refrigerated butter to room temperature 30-45 minutes before serving, or soften in the microwave at 20% power in 5-second bursts.
Common Queries and FAQs Section
Here, we’ve got you covered with some common questions that people often ask
Q: Why is my homemade butter so much paler than store-bought butter?
A: Your Cheesecake Factory butter is naturally pale because it lacks the artificial coloring (typically annatto or beta-carotene) added to most commercial butter. The natural color depends on the cow’s diet-grass-fed cream produces more yellow butter while grain-fed produces whiter butter. This pale color is authentic and doesn’t affect flavor or quality. If desired, you can add a tiny amount of natural beta-carotene or annatto for color.
Q: What exactly is the Cheesecake Factory butter brand they use?
A: The Cheesecake Factory butter brand isn’t a specific commercial product-the restaurant makes their signature whipped butter in-house or receives it from commercial dairy suppliers who churn it fresh. The magic is in the technique (whipping for fluffy texture) and serving it at room temperature rather than cold. Your homemade butter, when whipped and properly seasoned, replicates this experience perfectly.
Q: Can I make butter from half-and-half or light cream?
A: No, you need heavy cream with at least 36% fat content to make Cheesecake Factory butter. Half-and-half (10-18% fat) and light cream (18-30% fat) don’t contain enough butterfat to separate properly. The fat globules need to reach a critical concentration to coalesce into butter solids. Using lower-fat dairy products will only result in over-whipped cream that never separates.
Q: How do I get that super spreadable, fluffy texture like the restaurant?
A: The signature Cheesecake Factory butter for bread texture comes from three factors: bringing butter to room temperature (65-70°F), whipping it with a hand mixer to incorporate air (1-2 minutes on medium speed), and optionally adding 1-2 tablespoons of heavy cream while whipping to achieve the exact consistency you want. This creates that cloud-like, mousse-style texture that spreads without tearing bread.
Q: My butter separated but then turned into a greasy mess during rinsing. What happened?
A: Your butter melted during the rinsing process, which happens when the water isn’t cold enough or your kitchen is very warm. The solution is to use ice water (not just cold tap water) and work quickly. If your butter starts melting during rinsing, immediately refrigerate it for 10-15 minutes to firm up before continuing. In hot weather, consider making butter in the coolest part of your day or in an air-conditioned space.
Q: Is it safe to eat homemade butter, or does it need to be pasteurized?
A: The heavy cream you purchase is already pasteurized, so your how to make Cheesecake Factory butter creation is completely safe. You’re mechanically separating components of pasteurized cream, not introducing any raw ingredients. As long as you use clean equipment and wash your hands before handling, homemade butter is perfectly safe. The thorough rinsing actually removes milk solids that can harbor bacteria, making properly rinsed butter quite shelf-stable.
Q: Can I use a blender or Vitamix to make butter faster?
A: High-powered blenders can make butter, but they’re not ideal for this Cheesecake Factory butter recipe. The rapid blade action generates heat through friction, which can partially melt the butter during formation, creating a greasier texture. Additionally, the narrow base of most blenders makes it difficult to separate butter from buttermilk efficiently. Stick with a stand mixer, hand mixer, or food processor for best results. If you must use a blender, use pulse mode and work in very short bursts.
Q: Does homemade butter have less cholesterol or calories than store-bought?
A: No, Cheesecake Factory butter made at home has essentially identical nutritional content to commercial butter since both are pure butterfat from cream. One tablespoon contains approximately 100 calories, 11 grams of fat, and 30mg of cholesterol regardless of whether it’s homemade or store-bought. The advantage of homemade butter is freshness, flavor, and the absence of artificial additives-not reduced calories or cholesterol. However, the whipped texture means you might use less per serving since it spreads more easily.

Cheesecake Factory Butter Recipe
Ingredients
Equipment
Method
- The foundation of perfect Cheesecake Factory butter begins with temperature. Remove your heavy whipping cream from the refrigerator only when you’re ready to begin-it should be thoroughly chilled, ideally 35-40°F. Check the label to ensure your cream has at least 36% fat content, though 40% or higher produces superior results with better yield and creamier texture. If possible, chill your mixer bowl and whisk attachment in the freezer for 10-15 minutes before starting. Cold temperatures help the butterfat molecules separate cleanly from the liquid buttermilk, creating a smoother final product. Fill a separate bowl with ice water and set it aside-you’ll need this for the crucial rinsing step later.
- Pour your cold heavy cream into the chilled mixer bowl, filling it no more than halfway to allow room for expansion. Attach the whisk attachment securely to your stand mixer. Begin mixing on low speed (setting 4-5 on most stand mixers) to prevent splattering. The cream will initially remain liquid and start coating the sides of the bowl. After about 1-2 minutes on low speed, you can gradually increase to medium speed as the cream begins to thicken. If you’re using a hand mixer, start on the lowest setting and work your way up. This gradual acceleration prevents a creamy mess while ensuring even incorporation of air into the fat molecules-an essential step in learning how to make Cheesecake Factory butter.
- Over the next 5-10 minutes, you’ll witness a fascinating culinary transformation. First, the cream reaches soft peaks-this is still whipped cream territory, perfect for desserts. Continue whipping past this stage. The mixture will progress to stiff peaks, becoming thick, glossy, and holding its shape firmly. Don’t stop here-you’re “over-whipping” intentionally. Keep going and the texture will suddenly turn grainy and almost powdery-looking, taking on a distinctly yellowish hue. You’ll notice it starts looking lumpy and “pattery,” losing that smooth whipped cream appearance. This is exactly what you want for Cheesecake Factory butter recipe success. The transformation from whipped cream to butter happens surprisingly fast, often within seconds, so stay attentive.
- Suddenly, and it truly is sudden, the mixture will “break.” You’ll see liquid (buttermilk) pooling at the bottom of the bowl while solid yellow clumps of butterfat form and cling to the whisk and bowl sides. The sound changes too-from a thick, heavy whooshing to a more splashy, sloshing noise as the buttermilk separates. When you see this clear separation with buttermilk sloshing around distinct butter solids, reduce your mixer speed to low or turn it off completely to avoid splashing buttermilk everywhere. The exact timing varies based on cream fat percentage and mixer power-higher fat cream and more powerful mixers work faster. For this Cheesecake Factory butter, the separation typically occurs between 7-12 minutes of total mixing time.
- Stop the mixer completely once separation is clear. Using a rubber spatula, carefully scrape the butter solids from the whisk attachment and bowl sides. The butter may be in large chunks or smaller clumps-gather it all together, pressing it into a cohesive mass with your hands or the back of a spatula. Don’t worry if it looks rough at this stage; you’re not finished yet. Work the butter mass gently to express as much buttermilk as possible, squeezing it like a sponge. Pour the drained buttermilk through a fine mesh strainer into a jar for storage-this precious byproduct is perfect for pancakes, biscuits, mashed potatoes, salad dressings, and baking. Never discard it! The buttermilk will have a tangy, cultured flavor that’s far superior to most store-bought versions.
- This step is what separates mediocre homemade butter from exceptional Cheesecake Factory butter for bread that lasts. Place your butter mass in a clean bowl and pour ice-cold water over it, completely submerging the butter. Using your hands, a spatula, or wooden spoon, knead, press, and fold the butter in the cold water. You’re washing out residual buttermilk, which contains milk solids that cause butter to spoil quickly. The water will quickly turn cloudy and milky. Drain this cloudy water completely. Repeat the process: add fresh ice-cold water, knead the butter, watch the water turn cloudy, and drain. Continue this rinsing cycle 2-4 times until the water remains mostly clear after kneading. This thorough rinsing is non-negotiable-it extends your butter’s shelf life from days to weeks in the refrigerator, or months in the freezer.
- Once your rinse water runs clear, give the butter a final, firm pressing to remove all excess water. Work it with your hands or press it against the side of the bowl with a spatula, squeezing out every drop of moisture you can. The butter should feel firm, smooth, and cohesive. At this point, if you want salted butter like the Cheesecake Factory butter, work in a small amount of fine sea salt or flaky salt to taste. Start with just a pinch (⅛ teaspoon per ½ pound butter) and knead it in thoroughly, then taste and adjust. Homemade butter is naturally milder and paler than commercial butter, so season gradually. For compound butter variations, this is the perfect time to fold in minced fresh herbs, roasted garlic, honey, cinnamon-sugar, or other flavorings.
- Shape your finished Cheesecake Factory butter recipe creation however you prefer. You can form it into rustic pats, roll it into logs using parchment paper (like commercial butter sticks), press it into decorative butter molds, or simply transfer it to an airtight container. For the authentic restaurant presentation, whip the butter briefly with a hand mixer or fork to incorporate a bit of air, creating that signature fluffy, spreadable texture. Line your storage container with parchment paper to prevent sticking. Store in the refrigerator where it will keep for 3-4 weeks thanks to your thorough rinsing, or freeze for 6-12 months wrapped tightly in parchment and placed in a freezer bag. Properly stored, frozen butter maintains quality for extended periods-some sources claim years, though 6-12 months is more practical for optimal flavor.
Video
Notes
Mastering this Cheesecake Factory butter recipe opens up a world of culinary possibilities while giving you a deeper appreciation for this fundamental ingredient. The process of transforming heavy cream into silky, flavorful butter is both surprisingly simple and remarkably satisfying-a perfect kitchen project for beginners and experienced cooks alike. Whether you’re recreating that restaurant experience with Cheesecake Factory butter for bread, experimenting with compound butter variations, or simply enjoying the superior freshness of homemade dairy, this skill elevates your cooking immediately. With proper technique and the storage tips provided, you’ll always have restaurant-quality Cheesecake Factory butter on hand for entertaining, everyday meals, and gift-giving. Once you experience the difference, you’ll wonder why you ever bought butter at the store!
We’d love to hear how this recipe turns out for you! Give it a try, then drop a comment below to share your thoughts and tips with us.
Also, follow along on Pinterest and Youtube for more tasty updates. Your support and thoughts mean the world!
what is the difference between normal butter and cheesecake Factory butter?
Normal butter is simply churned cream with a mild, slightly salty or unsalted taste. It’s plain and used for general cooking or spreading.perfect for pairing with their famous brown bread.