Ingredients
Equipment
Method
- Preheat your oven to 350°F (175°C). Ensure your cream cheese, eggs, and sour cream are at room temperature-this is crucial for achieving the smooth, lump-free texture that defines the Cheesecake Factory Godiva chocolate cheesecake. Cold ingredients create a lumpy batter and can result in uneven baking. Set out all ingredients and verify your springform pan bottom is correctly assembled (pattern side up) to prevent leaking.
- Place 24 chocolate sandwich cookies into your food processor and pulse until they form fine, even crumbs with no large chunks remaining. Drizzle in the 5 tablespoons of melted butter while pulsing, continuing until the mixture resembles wet sand and holds together when pressed. Don’t worry if it looks messy with butter pools initially-keep mixing. Press the crumb mixture firmly into the bottom of your ungreased 9-inch springform pan using your fingers first to distribute, then use a flat-bottomed glass or measuring cup to pack it down tightly, creating an even layer that extends slightly up the sides. This compression prevents a crumbly crust. Bake for 8-10 minutes until the crust looks set and smells toasted. Remove and let cool completely while you prepare the filling.
- In a microwave-safe bowl, combine 1 cup Godiva bittersweet chocolate and ¾ cup Godiva semi-sweet chocolate chips. Pour ¼ cup hot freshly brewed coffee over the chocolate and let it sit undisturbed for 1 minute-this allows the heat to begin melting the chocolate. Microwave in 20-second intervals, stirring gently between each burst, until the mixture is completely smooth and glossy. The residual heat will melt any remaining small pieces, so avoid overheating which can cause the chocolate to seize or separate. The coffee enhances the chocolate’s depth without making it taste like coffee. Set aside to cool to lukewarm-if it’s too hot when added to the batter, it could scramble the eggs.
- In your stand mixer fitted with the paddle attachment (or using a hand mixer), beat the room-temperature cream cheese on medium speed for 2-3 minutes until completely smooth, creamy, and lump-free. Stop to scrape down the bowl and paddle frequently-this is essential for preventing lumps in your Cheesecake Factory Godiva chocolate cheesecake. Add 1 cup granulated sugar and a pinch of salt; mix until fully incorporated, then scrape the bowl again. Add the ¼ cup room-temperature sour cream and 1 tablespoon vanilla extract; mix until smooth. Add the 4 eggs one at a time, beating just until each egg is incorporated before adding the next-overmixing after adding eggs creates excess air bubbles that can cause cracking. Scrape the bowl after each addition.
- With the mixer on low speed, sift the 3 tablespoons all-purpose flour directly into the batter to prevent clumps. Mix just until the flour disappears into the batter. The flour helps stabilize the cheesecake structure. Pour in your cooled chocolate ganache and mix on low-medium speed until the batter becomes uniformly deep chocolate brown and gloriously glossy. Give the bowl one final thorough scrape with a rubber spatula, ensuring no cream cheese streaks remain and the batter is completely homogeneous. The batter should be smooth, thick, and pourable.
- Pour the chocolate cheesecake filling over your cooled Oreo crust, using an offset spatula or the back of a spoon to smooth the top surface. Give the pan a gentle jiggle-the surface should settle into an even layer. If you notice any air bubbles on the surface, gently tap the pan on the counter or pop them with a toothpick. Reduce your oven temperature to 325°F (163°C). If desired, place a small ramekin filled with water on the bottom oven rack to create steam, which helps prevent surface cracks-though this godiva chocolate cheesecake factory recipe is forgiving even without it.
- Place the cheesecake on the center oven rack and bake at 325°F for 20 minutes. After 20 minutes, reduce the oven temperature to 300°F (149°C) and continue baking for an additional 30 minutes. The gradual temperature reduction ensures even, gentle cooking that prevents cracking. The cheesecake is done when the edges are set but the center still jiggles like firm Jell-O when you gently shake the pan-it should wobble as a whole disc, not ripple like liquid. A slight dome in the center is normal and will flatten as it cools. Overbaking creates a dry, grainy texture, so trust the jiggle test.
- Turn off the oven and crack the door open slightly, allowing the cheesecake to cool gradually in the residual warmth for about 15 minutes. This prevents thermal shock that causes cracking. Then remove the cheesecake from the oven and let it cool completely at room temperature on a wire rack for 1-2 hours. Once cooled to room temperature, cover the pan with plastic wrap or aluminum foil and refrigerate for at least 4-6 hours, though overnight is ideal. The Cheesecake Factory Godiva chocolate needs this time to firm up properly and develop its signature dense, creamy texture.
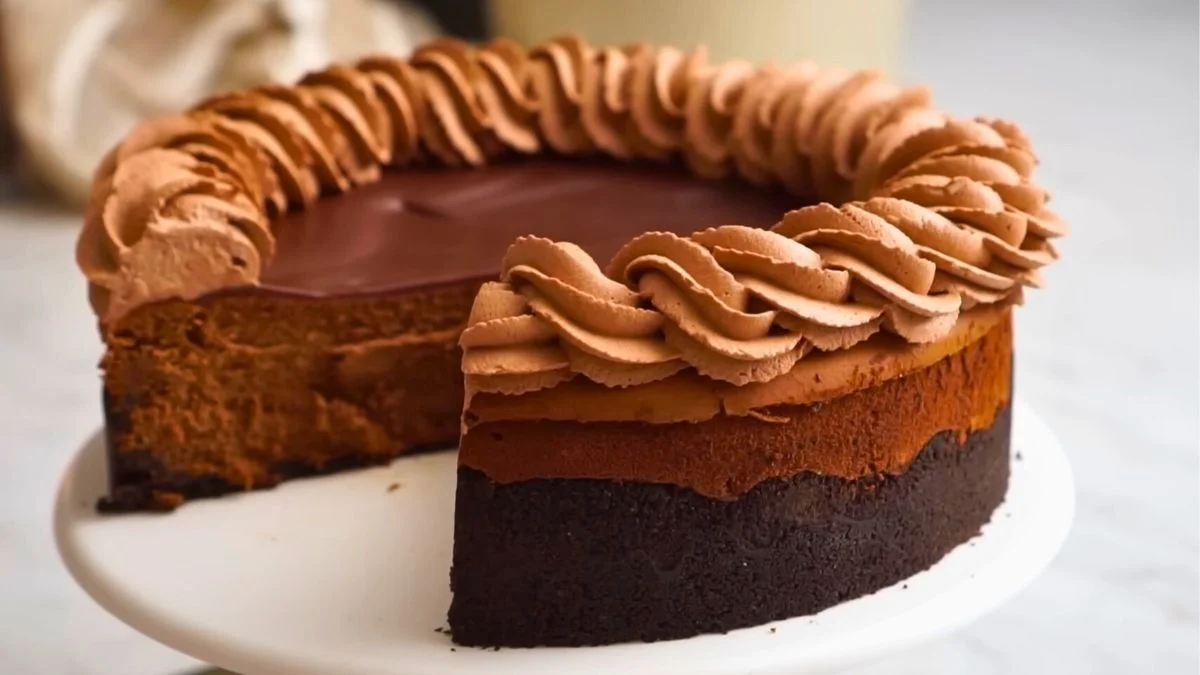
- Once your cheesecake is completely chilled and firm, prepare the glossy topping. In a microwave-safe bowl, combine ½ cup Godiva chocolate (bittersweet or semi-sweet) with ⅓ cup heavy cream. Microwave in 20-second bursts, stirring between each interval, until the mixture is completely smooth and pourable. The ganache will seem thin initially, but it thickens quickly when it contacts the cold cheesecake surface. Pour the ganache over the center of the chilled cheesecake, using an offset spatula to gently spread it to the edges in smooth, even strokes. Work quickly as it begins setting. Return the cheesecake to the refrigerator for at least 2 minutes to set the ganache layer.
- Place a metal mixing bowl and whisk attachment in the freezer for 5 minutes if possible-cold equipment helps cream whip faster. Add 2 cups cold heavy whipping cream, ¼ cup powdered sugar, 2 teaspoons vanilla extract, and 3 tablespoons sifted unsweetened cocoa powder to your chilled bowl. Start mixing on low speed to prevent cocoa powder from flying everywhere, then gradually increase to medium-high, then high speed. Whip until stiff peaks form-the cream should hold its shape firmly and stand up in peaks when you lift the whisk. This takes 3-5 minutes. Taste and adjust sweetness if needed. The whipped cream should be thick enough to pipe but still smooth and spreadable.
- Transfer the chocolate whipped cream to a piping bag fitted with a large closed star tip (such as tip 846). Fill the bag only about halfway to maintain control. Pipe decorative rosettes, corkscrews, or swirls around the top edge of your godiva chocolate brownie sundae cheesecake factory-inspired creation-the whipped cream adds the final elegant touch. You can create a border of rosettes or cover the entire top with piped designs, depending on your preference. If you’re not confident piping, simply spread the whipped cream over the top with an offset spatula for a more rustic presentation.
- To remove the cheesecake from the springform pan, first verify the bottom was assembled correctly. Run a thin knife or offset spatula around the inside edge of the pan to loosen any filling that may have stuck. Carefully release the springform clasp and gently lift away the outer ring. Use a large spatula to carefully slide the cheesecake (still on the pan bottom) onto your serving plate, or serve directly from the base. For clean, professional slices, dip a sharp knife in hot water, wipe it dry, and make your cut with one smooth motion. Wipe and rewarm the knife between each slice. Serve chilled and watch faces light up with your homemade Cheesecake Factory Godiva chocolate cheesecake.
Video
Notes
Store leftover Cheesecake Factory Godiva chocolate cheesecake covered in the refrigerator for up to 5 days. The whipped cream may soften slightly but remains delicious. For best texture, serve chilled-do not microwave entire slices. If you want the warm sundae experience, microwave individual slices for 10-15 seconds only. Freeze individual wrapped slices for up to 2 months; thaw in refrigerator overnight before serving.