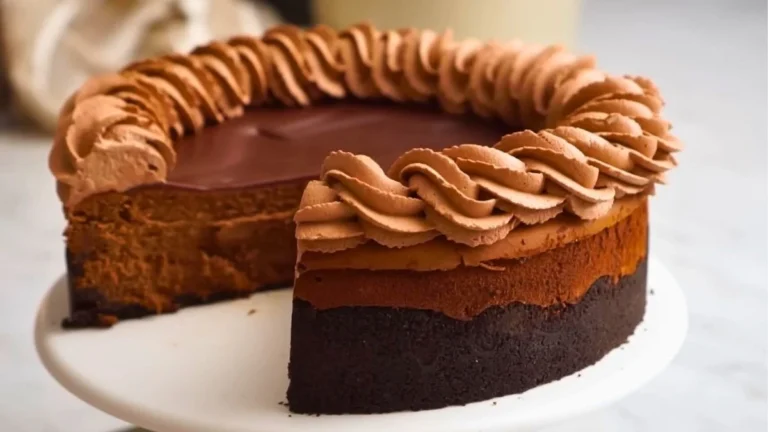
Craving the luxurious indulgence of Cheesecake Factory Godiva chocolate cheesecake but don’t want to leave your kitchen? This restaurant-quality godiva chocolate cheesecake factory recipe transforms premium chocolate and velvety cream cheese into an unforgettable dessert masterpiece.
The legendary Cheesecake Factory Godiva chocolate experience features layers of crispy Oreo crust, silky chocolate cheesecake filling infused with rich ganache, a glossy chocolate topping, and clouds of chocolate whipped cream.
While the Cheesecake Factory Godiva chocolate cheesecake typically costs upwards of $8 per slice, making this Cheesecake Factory Godiva chocolate cheesecake recipe at home allows you to serve an entire showstopping dessert for a fraction of the price. Perfect for special occasions or when you simply need something extraordinary, this recipe delivers bakery-level results.
What Does It Taste Like?
The godiva chocolate cheesecake factory experience is pure chocolate heaven with sophisticated balance. Each forkful reveals intensely rich, dark chocolate flavors that aren’t overly sweet-thanks to the bittersweet Godiva chocolate and subtle coffee enhancement that deepens the cocoa notes.

The cheesecake filling is impossibly smooth and creamy, almost mousse-like in texture, with tangy cream cheese preventing it from becoming cloying. The crispy Oreo crust provides satisfying crunch and additional chocolate dimension, while the Cheesecake Factory Godiva chocolate cheesecake ingredients like sour cream add subtle complexity.
The ganache topping contributes glossy elegance and concentrated chocolate intensity, and the chocolate whipped cream offers airy lightness that balances the dense richness below. It’s decadent yet refined-a true celebration of chocolate in its finest form.For more irresistible desserts, try our Creamy Carnivore Cheesecake Recipe or Cheesecake Factory Pineapple Upside Down Cheesecake Recipe. Pair it with Longhorn Steakhouse Potato Soup Recipe for a complete restaurant-style experience at home.
Ingredients and Kitchen Utensils Lists
Ingredients
Oreo Crust:
- 24 chocolate sandwich cookies (Oreos or similar)
- 5 tablespoons (70g) unsalted butter, melted
Chocolate Cheesecake Filling:
- 24 oz (3 packages/680g) cream cheese, room temperature
- 1 cup (200g) granulated sugar
- Pinch of salt
- ¼ cup (60g) sour cream, room temperature
- 1 tablespoon vanilla extract
- 4 large eggs, room temperature
- 3 tablespoons all-purpose flour
- 1 cup (170g) Godiva bittersweet chocolate
- ¾ cup (130g) Godiva semi-sweet chocolate chips
- ¼ cup (60ml) hot freshly brewed coffee (or hot milk/water)
Ganache Topping:
- ½ cup (85g) Godiva chocolate (bittersweet or semi-sweet)
- ⅓ cup (80ml) heavy cream
Chocolate Whipped Cream:
- 2 cups (480ml) cold heavy whipping cream
- ¼ cup (30g) powdered sugar
- 2 teaspoons vanilla extract
- 3 tablespoons unsweetened cocoa powder, sifted
Kitchen Utensils
- 9-inch springform pan
- Food processor (or zip-top bag + rolling pin)
- Stand mixer or hand mixer with paddle attachment
- Multiple mixing bowls (various sizes)
- Offset spatula
- Piping bag with large closed star tip (846 or similar)
- Microwave-safe bowl
- Fine-mesh sieve (for sifting)
- Flat-bottomed glass or measuring cup
- Rubber spatula
- Sharp knife for serving
- Optional: small ramekin for water bath
Preparation and Cooking Time with Serving
Prep Time: 35 minutes
Bake Time: 50 minutes
Cooling Time: 4-6 hours (or overnight)
Total Time: 5.5-7 hours
Servings: 12-16 slices
Difficulty Level: Intermediate to Advanced
Recipe Instructions with Steps
Step 1: Preheat and Prepare
Preheat your oven to 350°F (175°C). Ensure your cream cheese, eggs, and sour cream are at room temperature-this is crucial for achieving the smooth, lump-free texture that defines the Cheesecake Factory Godiva chocolate cheesecake. Cold ingredients create a lumpy batter and can result in uneven baking. Set out all ingredients and verify your springform pan bottom is correctly assembled (pattern side up) to prevent leaking.
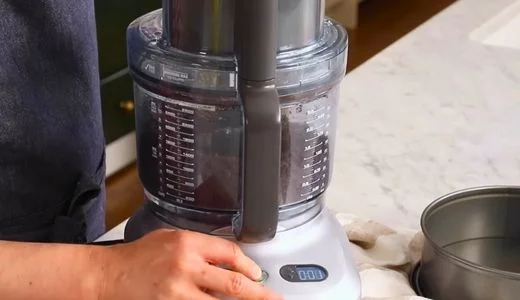
Step 2: Make the Oreo Crust
Place 24 chocolate sandwich cookies into your food processor and pulse until they form fine, even crumbs with no large chunks remaining. Drizzle in the 5 tablespoons of melted butter while pulsing, continuing until the mixture resembles wet sand and holds together when pressed. Don’t worry if it looks messy with butter pools initially-keep mixing. Press the crumb mixture firmly into the bottom of your ungreased 9-inch springform pan using your fingers first to distribute, then use a flat-bottomed glass or measuring cup to pack it down tightly, creating an even layer that extends slightly up the sides. This compression prevents a crumbly crust. Bake for 8-10 minutes until the crust looks set and smells toasted. Remove and let cool completely while you prepare the filling.
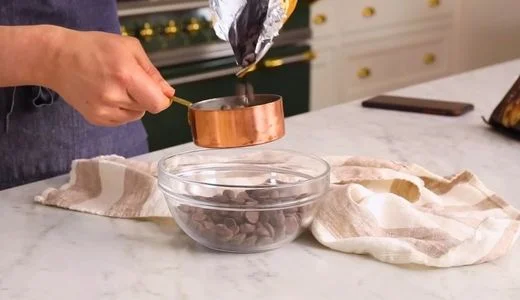
Step 3: Make the Chocolate Ganache for Filling
In a microwave-safe bowl, combine 1 cup Godiva bittersweet chocolate and ¾ cup Godiva semi-sweet chocolate chips. Pour ¼ cup hot freshly brewed coffee over the chocolate and let it sit undisturbed for 1 minute-this allows the heat to begin melting the chocolate. Microwave in 20-second intervals, stirring gently between each burst, until the mixture is completely smooth and glossy. The residual heat will melt any remaining small pieces, so avoid overheating which can cause the chocolate to seize or separate. The coffee enhances the chocolate’s depth without making it taste like coffee. Set aside to cool to lukewarm-if it’s too hot when added to the batter, it could scramble the eggs.
Step 4: Make the Chocolate Cheesecake Filling
In your stand mixer fitted with the paddle attachment (or using a hand mixer), beat the room-temperature cream cheese on medium speed for 2-3 minutes until completely smooth, creamy, and lump-free. Stop to scrape down the bowl and paddle frequently-this is essential for preventing lumps in your Cheesecake Factory Godiva chocolate cheesecake. Add 1 cup granulated sugar and a pinch of salt; mix until fully incorporated, then scrape the bowl again. Add the ¼ cup room-temperature sour cream and 1 tablespoon vanilla extract; mix until smooth. Add the 4 eggs one at a time, beating just until each egg is incorporated before adding the next-overmixing after adding eggs creates excess air bubbles that can cause cracking. Scrape the bowl after each addition.
Step 5: Add Flour and Chocolate Ganache
With the mixer on low speed, sift the 3 tablespoons all-purpose flour directly into the batter to prevent clumps. Mix just until the flour disappears into the batter. The flour helps stabilize the cheesecake structure. Pour in your cooled chocolate ganache and mix on low-medium speed until the batter becomes uniformly deep chocolate brown and gloriously glossy. Give the bowl one final thorough scrape with a rubber spatula, ensuring no cream cheese streaks remain and the batter is completely homogeneous. The batter should be smooth, thick, and pourable.
Step 6: Pour and Prepare for Baking
Pour the chocolate cheesecake filling over your cooled Oreo crust, using an offset spatula or the back of a spoon to smooth the top surface. Give the pan a gentle jiggle-the surface should settle into an even layer. If you notice any air bubbles on the surface, gently tap the pan on the counter or pop them with a toothpick. Reduce your oven temperature to 325°F (163°C). If desired, place a small ramekin filled with water on the bottom oven rack to create steam, which helps prevent surface cracks-though this godiva chocolate cheesecake factory recipe is forgiving even without it.

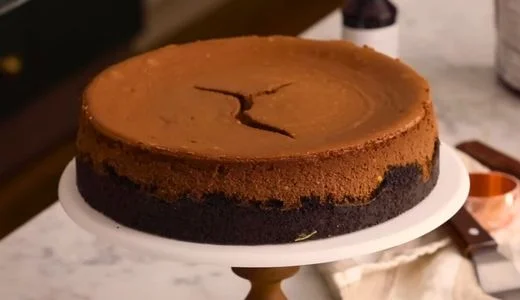
Step 7: Bake the Cheesecake
Place the cheesecake on the center oven rack and bake at 325°F for 20 minutes. After 20 minutes, reduce the oven temperature to 300°F (149°C) and continue baking for an additional 30 minutes. The gradual temperature reduction ensures even, gentle cooking that prevents cracking. The cheesecake is done when the edges are set but the center still jiggles like firm Jell-O when you gently shake the pan-it should wobble as a whole disc, not ripple like liquid. A slight dome in the center is normal and will flatten as it cools. Overbaking creates a dry, grainy texture, so trust the jiggle test.
Step 8: Cool Completely
Turn off the oven and crack the door open slightly, allowing the cheesecake to cool gradually in the residual warmth for about 15 minutes. This prevents thermal shock that causes cracking. Then remove the cheesecake from the oven and let it cool completely at room temperature on a wire rack for 1-2 hours. Once cooled to room temperature, cover the pan with plastic wrap or aluminum foil and refrigerate for at least 4-6 hours, though overnight is ideal. The Cheesecake Factory Godiva chocolate needs this time to firm up properly and develop its signature dense, creamy texture.
Step 9: Make the Ganache Topping
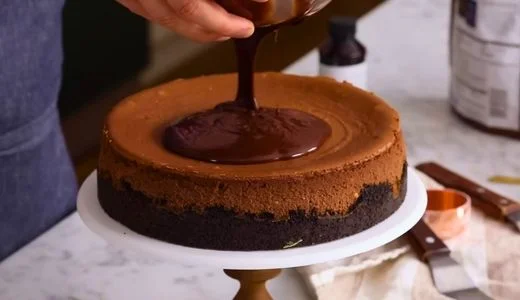
Once your cheesecake is completely chilled and firm, prepare the glossy topping. In a microwave-safe bowl, combine ½ cup Godiva chocolate (bittersweet or semi-sweet) with ⅓ cup heavy cream. Microwave in 20-second bursts, stirring between each interval, until the mixture is completely smooth and pourable. The ganache will seem thin initially, but it thickens quickly when it contacts the cold cheesecake surface. Pour the ganache over the center of the chilled cheesecake, using an offset spatula to gently spread it to the edges in smooth, even strokes. Work quickly as it begins setting. Return the cheesecake to the refrigerator for at least 2 minutes to set the ganache layer.
Step 10: Make the Chocolate Whipped Cream
Place a metal mixing bowl and whisk attachment in the freezer for 5 minutes if possible-cold equipment helps cream whip faster. Add 2 cups cold heavy whipping cream, ¼ cup powdered sugar, 2 teaspoons vanilla extract, and 3 tablespoons sifted unsweetened cocoa powder to your chilled bowl. Start mixing on low speed to prevent cocoa powder from flying everywhere, then gradually increase to medium-high, then high speed. Whip until stiff peaks form-the cream should hold its shape firmly and stand up in peaks when you lift the whisk. This takes 3-5 minutes. Taste and adjust sweetness if needed. The whipped cream should be thick enough to pipe but still smooth and spreadable.
Step 11: Pipe and Decorate
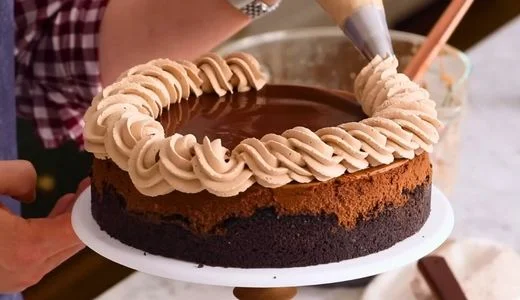
Transfer the chocolate whipped cream to a piping bag fitted with a large closed star tip (such as tip 846). Fill the bag only about halfway to maintain control. Pipe decorative rosettes, corkscrews, or swirls around the top edge of your godiva chocolate brownie sundae cheesecake factory-inspired creation-the whipped cream adds the final elegant touch. You can create a border of rosettes or cover the entire top with piped designs, depending on your preference. If you’re not confident piping, simply spread the whipped cream over the top with an offset spatula for a more rustic presentation.
Step 12: Release and Serve
To remove the cheesecake from the springform pan, first verify the bottom was assembled correctly. Run a thin knife or offset spatula around the inside edge of the pan to loosen any filling that may have stuck. Carefully release the springform clasp and gently lift away the outer ring. Use a large spatula to carefully slide the cheesecake (still on the pan bottom) onto your serving plate, or serve directly from the base. For clean, professional slices, dip a sharp knife in hot water, wipe it dry, and make your cut with one smooth motion. Wipe and rewarm the knife between each slice. Serve chilled and watch faces light up with your homemade Cheesecake Factory Godiva chocolate cheesecake.
Customization and Pairing for Serving Ideas
1. Godiva Chocolate Brownie Sundae Transformation
Transform your Cheesecake Factory Godiva chocolate cheesecake into the famous godiva chocolate brownie sundae cheesecake factory experience by serving warm. Cut a slice, microwave for 15-20 seconds until just slightly warm, then top with a scoop of premium vanilla ice cream, hot fudge sauce, whipped cream, and a maraschino cherry. Add a sprinkle of chopped toasted pecans or walnuts for crunch. This warm-cold contrast creates a restaurant dessert experience that rivals the original.
2. Espresso Martini Pairing
Since the Cheesecake Factory Godiva chocolate cheesecake ingredients include coffee, pair your dessert with espresso martinis for an elevated adult dessert experience. The coffee liqueur and vodka complement the chocolate intensity while the cocktail’s slight bitterness balances the cheesecake’s richness. Alternatively, serve alongside Irish coffee, cappuccinos, or a bold dark roast coffee that echoes the dessert’s sophisticated chocolate notes.
3. White Chocolate Raspberry Variation
Create a stunning flavor contrast by drizzling white chocolate ganache and raspberry coulis over each slice before serving. The tartness of fresh raspberries or raspberry sauce cuts through the rich dark chocolate beautifully, while white chocolate adds visual appeal and sweet creaminess. Garnish with fresh raspberries and mint leaves for an elegant restaurant-style presentation that photographs beautifully.
4. Peanut Butter Layer Addition
For peanut butter chocolate lovers, spread a thin layer of creamy peanut butter between the Oreo crust and chocolate filling before baking. Alternatively, fold ⅓ cup peanut butter into the cheesecake batter for a subtle nutty dimension throughout. Top finished slices with chopped Reese’s peanut butter cups and a drizzle of melted peanut butter for a godiva chocolate cheesecake factory-inspired twist that appeals to candy lovers.
5. Individual Mini Cheesecakes
Transform this godiva chocolate cheesecake factory recipe into individual portions using a muffin tin lined with cupcake liners. Divide the crust and filling among 18-24 cups, reducing baking time to 18-22 minutes at 325°F. These mini versions are perfect for parties, portion control, and gift-giving. Top each with a small ganache circle and a single chocolate whipped cream rosette for adorable individual desserts.
6. Berry Compote Contrast
Balance the intensity of the Cheesecake Factory Godiva chocolate cheesecake by serving with a warm mixed berry compote. Simmer fresh or frozen blueberries, strawberries, and blackberries with a touch of sugar and lemon juice until syrupy. The fruit’s natural acidity and bright flavors provide refreshing contrast to the rich chocolate, making each bite more interesting. This pairing also adds antioxidants and a pop of jewel-toned color.
7. Salted Caramel Drizzle Enhancement
Elevate your Cheesecake Factory Godiva chocolate cheesecake recipe with salted caramel sauce drizzled over the ganache topping or around the plate. The sweet-salty caramel creates complex flavor layering that complements dark chocolate beautifully. Sprinkle flaky sea salt over the whipped cream rosettes for an on-trend sweet-savory finish. This combination appeals to modern dessert lovers who appreciate nuanced flavor profiles.

Tips Section
1. Room Temperature Ingredients Are Non-Negotiable
The single most important factor in achieving the silky, smooth texture of Cheesecake Factory Godiva chocolate is using properly tempered ingredients. Remove cream cheese, eggs, and sour cream from the refrigerator at least 2 hours before beginning, or up to 4 hours if your kitchen is cool. Room temperature cream cheese beats smoothly without lumps, while cold cream cheese creates a grainy batter no matter how long you mix. Cold eggs can cause the chocolate ganache to seize when combined. If you forget to bring ingredients to room temperature, place unopened cream cheese packages in warm water for 10 minutes, and eggs (in their shells) in warm water for 5 minutes.
2. Prevent Cracking with Gentle Baking
Cracks in cheesecake occur from two main causes: overbaking and rapid temperature changes. The gradual temperature reduction method in this godiva chocolate cheesecake factory recipe (starting at 325°F, then dropping to 300°F) ensures gentle, even cooking. Always check for doneness at the minimum time-the center should still jiggle like set gelatin when gently shaken. Remember that cheesecake continues cooking from residual heat as it cools, so slight under-baking in the oven ensures perfect texture once cooled. The gradual cooling in the turned-off oven with the door cracked prevents thermal shock that causes surface cracks.
3. Coffee Enhances Chocolate Without Tasting Like Coffee
The ¼ cup of hot coffee in the ganache might seem unusual, but it’s a pastry chef secret that intensifies chocolate flavor without making the dessert taste like mocha. Coffee contains compounds that amplify cocoa’s bitter notes and aromatic complexity, making chocolate taste more “chocolatey.” If you’re sensitive to caffeine or strongly opposed to coffee, substitute with hot milk or plain hot water-the chocolate will still be delicious, just slightly less complex. Never skip the liquid entirely, as it’s needed to create the smooth ganache texture.
4. Quality Chocolate Makes a Measurable Difference
While this Cheesecake Factory Godiva chocolate cheesecake ingredients list specifies Godiva chocolate, the principle is using high-quality chocolate with a cocoa content of 60-70% for bittersweet and around 50% for semi-sweet. Cheap chocolate chips contain stabilizers that prevent smooth melting and create a waxy mouthfeel. Brands like Ghirardelli, Callebaut, Valrhona, or Guittard produce superior results. The difference in flavor depth, smoothness, and overall quality is immediately noticeable-this is a showpiece dessert where premium ingredients shine.
5. Springform Pan Assembly and Leak Prevention
Many home bakers unknowingly assemble springform pans incorrectly, leading to leaks and frustration. The removable bottom should be inserted with the lip (raised edge) facing UP-this creates a slightly raised platform that the sides grip securely. If you’re concerned about leaks, wrap the outside bottom of the pan with aluminum foil before adding the crust. For extra insurance, place the springform pan on a baking sheet during baking to catch any potential drips and make oven placement easier.
6. Achieving Stiff Peaks for Piping
The chocolate whipped cream must reach stiff peaks to hold decorative piped shapes-soft peaks will deflate and lose definition. Stiff peaks stand straight up when you lift the whisk and don’t droop or curl over. Stop the mixer periodically to check, as the window between stiff peaks and overwhipped butter-like texture is narrow. If you accidentally overwhip slightly, gently fold in 1-2 tablespoons of unwhipped cold cream to restore smooth texture. Sifting the cocoa powder before adding prevents frustrating lumps that mar the whipped cream’s silky texture.
7. Storage and Make-Ahead Strategy
This godiva chocolate cheesecake factory recipe is ideal for make-ahead entertaining. The cheesecake can be baked up to 3 days in advance-simply wrap it tightly in plastic wrap and store in the refrigerator. Add the ganache topping and whipped cream within 4-6 hours of serving for optimal freshness and appearance. The whipped cream holds for several hours but may weep slightly if made too far in advance. For longer storage, freeze the baked, cooled, ungarnished cheesecake (wrapped airtight) for up to 1 month. Thaw overnight in the refrigerator before adding toppings.

Storage and Reheating Guidance
Store leftover Cheesecake Factory Godiva chocolate cheesecake covered in the refrigerator for up to 5 days. The whipped cream may soften slightly but remains delicious. For best texture, serve chilled-do not microwave entire slices. If you want the warm sundae experience, microwave individual slices for 10-15 seconds only. Freeze individual wrapped slices for up to 2 months; thaw in refrigerator overnight before serving.
Common Queries and FAQs Section
Here, we’ve got you covered with some common questions that people often ask
Q: Can I use a different crust instead of Oreo cookies?
A: Absolutely! While Oreo crust is traditional for the Cheesecake Factory Godiva chocolate cheesecake, you can use graham cracker crust (1½ cups graham cracker crumbs + 5 tablespoons melted butter + 2 tablespoons sugar), chocolate graham crackers, Nilla wafers, or even brownie crust. Each creates a different but delicious foundation. Gingersnap crust adds spicy warmth that complements dark chocolate beautifully.
Q: Why is my cheesecake cracked even though I followed the recipe?
A: Cracking usually results from overbaking, overmixing after adding eggs, or rapid temperature changes. Check your oven temperature with an oven thermometer-many ovens run hot. Always look for the jiggle test at minimum baking time. If cracks do appear, don’t worry-the ganache topping and whipped cream completely cover them, and the flavor remains perfect. Small cracks are normal and don’t affect the delicious taste of your Cheesecake Factory Godiva chocolate cheesecake recipe.
Q: Can I make this without a springform pan?
A: While a springform pan is highly recommended for easy removal, you can use a regular 9-inch cake pan lined with parchment paper, leaving long overhangs on two sides to create handles for lifting. The presentation won’t be as clean, but the taste will be identical. Deep-dish pie pans also work but adjust the baking time, checking earlier as the thinner cheesecake will cook faster.
Q: How do I know when the cheesecake is done baking?
A: The perfect doneness for godiva chocolate cheesecake factory style is when the edges are set (don’t jiggle) but the center 3-4 inch circle still wobbles like firm Jell-O when you gently shake the pan. It should move as one cohesive disc, not ripple like liquid. An instant-read thermometer inserted in the center should read 150-155°F. The cheesecake firms considerably as it cools and chills.
Q: Can I substitute milk chocolate for the bittersweet chocolate?
A: While you can substitute milk chocolate, the result will be significantly sweeter and less sophisticated than the authentic Cheesecake Factory Godiva chocolate cheesecake. The bittersweet chocolate’s slight bitterness balances the sugar and creates depth. If you prefer sweeter chocolate, use all semi-sweet instead of the bittersweet-semi-sweet combination, but avoid milk chocolate entirely as it makes the dessert cloying.
Q: Why does my ganache look grainy or separated?
A: Ganache separates (breaks) when chocolate is overheated or when cold liquid hits hot chocolate. Always let the hot coffee sit on the chocolate for a minute before stirring, and microwave in short 20-second bursts. If your ganache does break, try whisking in 1-2 teaspoons of hot water or cream-this often brings it back together. Using high-quality chocolate with proper cocoa butter content also prevents separation.
Q: Can I make this cheesecake dairy-free or gluten-free?
A: For gluten-free, use gluten-free chocolate sandwich cookies for the crust and substitute the 3 tablespoons all-purpose flour with cornstarch or gluten-free flour blend. For dairy-free, use vegan cream cheese (Kite Hill or Miyoko’s), coconut cream instead of sour cream and heavy cream, and vegan butter. The texture will differ slightly but remains delicious. Ensure all chocolate is dairy-free (many dark chocolates naturally are).
Q: How far in advance can I make the components?
A: The Oreo crust can be made and baked up to 2 days ahead (store covered at room temperature). The baked cheesecake keeps refrigerated for 3 days before adding toppings. The ganache can be made 1 week ahead (refrigerate, then gently rewarm). Only make the whipped cream within 6 hours of serving for best volume and texture. This make-ahead flexibility makes the Cheesecake Factory Godiva chocolate cheesecake recipe perfect for entertaining.

Cheesecake Factory Godiva Chocolate Cheesecake Recipe
Ingredients
Equipment
Method
- Preheat your oven to 350°F (175°C). Ensure your cream cheese, eggs, and sour cream are at room temperature-this is crucial for achieving the smooth, lump-free texture that defines the Cheesecake Factory Godiva chocolate cheesecake. Cold ingredients create a lumpy batter and can result in uneven baking. Set out all ingredients and verify your springform pan bottom is correctly assembled (pattern side up) to prevent leaking.
- Place 24 chocolate sandwich cookies into your food processor and pulse until they form fine, even crumbs with no large chunks remaining. Drizzle in the 5 tablespoons of melted butter while pulsing, continuing until the mixture resembles wet sand and holds together when pressed. Don’t worry if it looks messy with butter pools initially-keep mixing. Press the crumb mixture firmly into the bottom of your ungreased 9-inch springform pan using your fingers first to distribute, then use a flat-bottomed glass or measuring cup to pack it down tightly, creating an even layer that extends slightly up the sides. This compression prevents a crumbly crust. Bake for 8-10 minutes until the crust looks set and smells toasted. Remove and let cool completely while you prepare the filling.
- In a microwave-safe bowl, combine 1 cup Godiva bittersweet chocolate and ¾ cup Godiva semi-sweet chocolate chips. Pour ¼ cup hot freshly brewed coffee over the chocolate and let it sit undisturbed for 1 minute-this allows the heat to begin melting the chocolate. Microwave in 20-second intervals, stirring gently between each burst, until the mixture is completely smooth and glossy. The residual heat will melt any remaining small pieces, so avoid overheating which can cause the chocolate to seize or separate. The coffee enhances the chocolate’s depth without making it taste like coffee. Set aside to cool to lukewarm-if it’s too hot when added to the batter, it could scramble the eggs.
- In your stand mixer fitted with the paddle attachment (or using a hand mixer), beat the room-temperature cream cheese on medium speed for 2-3 minutes until completely smooth, creamy, and lump-free. Stop to scrape down the bowl and paddle frequently-this is essential for preventing lumps in your Cheesecake Factory Godiva chocolate cheesecake. Add 1 cup granulated sugar and a pinch of salt; mix until fully incorporated, then scrape the bowl again. Add the ¼ cup room-temperature sour cream and 1 tablespoon vanilla extract; mix until smooth. Add the 4 eggs one at a time, beating just until each egg is incorporated before adding the next-overmixing after adding eggs creates excess air bubbles that can cause cracking. Scrape the bowl after each addition.
- With the mixer on low speed, sift the 3 tablespoons all-purpose flour directly into the batter to prevent clumps. Mix just until the flour disappears into the batter. The flour helps stabilize the cheesecake structure. Pour in your cooled chocolate ganache and mix on low-medium speed until the batter becomes uniformly deep chocolate brown and gloriously glossy. Give the bowl one final thorough scrape with a rubber spatula, ensuring no cream cheese streaks remain and the batter is completely homogeneous. The batter should be smooth, thick, and pourable.
- Pour the chocolate cheesecake filling over your cooled Oreo crust, using an offset spatula or the back of a spoon to smooth the top surface. Give the pan a gentle jiggle-the surface should settle into an even layer. If you notice any air bubbles on the surface, gently tap the pan on the counter or pop them with a toothpick. Reduce your oven temperature to 325°F (163°C). If desired, place a small ramekin filled with water on the bottom oven rack to create steam, which helps prevent surface cracks-though this godiva chocolate cheesecake factory recipe is forgiving even without it.
- Place the cheesecake on the center oven rack and bake at 325°F for 20 minutes. After 20 minutes, reduce the oven temperature to 300°F (149°C) and continue baking for an additional 30 minutes. The gradual temperature reduction ensures even, gentle cooking that prevents cracking. The cheesecake is done when the edges are set but the center still jiggles like firm Jell-O when you gently shake the pan-it should wobble as a whole disc, not ripple like liquid. A slight dome in the center is normal and will flatten as it cools. Overbaking creates a dry, grainy texture, so trust the jiggle test.
- Turn off the oven and crack the door open slightly, allowing the cheesecake to cool gradually in the residual warmth for about 15 minutes. This prevents thermal shock that causes cracking. Then remove the cheesecake from the oven and let it cool completely at room temperature on a wire rack for 1-2 hours. Once cooled to room temperature, cover the pan with plastic wrap or aluminum foil and refrigerate for at least 4-6 hours, though overnight is ideal. The Cheesecake Factory Godiva chocolate needs this time to firm up properly and develop its signature dense, creamy texture.
- Once your cheesecake is completely chilled and firm, prepare the glossy topping. In a microwave-safe bowl, combine ½ cup Godiva chocolate (bittersweet or semi-sweet) with ⅓ cup heavy cream. Microwave in 20-second bursts, stirring between each interval, until the mixture is completely smooth and pourable. The ganache will seem thin initially, but it thickens quickly when it contacts the cold cheesecake surface. Pour the ganache over the center of the chilled cheesecake, using an offset spatula to gently spread it to the edges in smooth, even strokes. Work quickly as it begins setting. Return the cheesecake to the refrigerator for at least 2 minutes to set the ganache layer.
- Place a metal mixing bowl and whisk attachment in the freezer for 5 minutes if possible-cold equipment helps cream whip faster. Add 2 cups cold heavy whipping cream, ¼ cup powdered sugar, 2 teaspoons vanilla extract, and 3 tablespoons sifted unsweetened cocoa powder to your chilled bowl. Start mixing on low speed to prevent cocoa powder from flying everywhere, then gradually increase to medium-high, then high speed. Whip until stiff peaks form-the cream should hold its shape firmly and stand up in peaks when you lift the whisk. This takes 3-5 minutes. Taste and adjust sweetness if needed. The whipped cream should be thick enough to pipe but still smooth and spreadable.
- Transfer the chocolate whipped cream to a piping bag fitted with a large closed star tip (such as tip 846). Fill the bag only about halfway to maintain control. Pipe decorative rosettes, corkscrews, or swirls around the top edge of your godiva chocolate brownie sundae cheesecake factory-inspired creation-the whipped cream adds the final elegant touch. You can create a border of rosettes or cover the entire top with piped designs, depending on your preference. If you’re not confident piping, simply spread the whipped cream over the top with an offset spatula for a more rustic presentation.
- To remove the cheesecake from the springform pan, first verify the bottom was assembled correctly. Run a thin knife or offset spatula around the inside edge of the pan to loosen any filling that may have stuck. Carefully release the springform clasp and gently lift away the outer ring. Use a large spatula to carefully slide the cheesecake (still on the pan bottom) onto your serving plate, or serve directly from the base. For clean, professional slices, dip a sharp knife in hot water, wipe it dry, and make your cut with one smooth motion. Wipe and rewarm the knife between each slice. Serve chilled and watch faces light up with your homemade Cheesecake Factory Godiva chocolate cheesecake.
Video
Notes
This Cheesecake Factory Godiva chocolate cheesecake recipe brings iconic restaurant decadence into your home kitchen with impressive but achievable techniques. The combination of buttery Oreo crust, intensely chocolate cream cheese filling, glossy ganache, and fluffy chocolate whipped cream creates layers of texture and flavor that rival the original.
Whether you’re celebrating a special occasion, impressing dinner guests, or simply treating yourself to something extraordinary, this godiva chocolate cheesecake factory creation delivers bakery-quality results that look and taste like they came from a professional pastry chef. With proper attention to technique-especially room temperature ingredients and gentle baking-your homemade version will become the dessert everyone requests. Happy baking!
We’d love to hear how this recipe turns out for you! Give it a try, then drop a comment below to share your thoughts and tips with us.
Also, follow along on Pinterest and Youtube for more tasty updates. Your support and thoughts mean the world!