The Cheesecake Factory tuxedo cheesecake stands as one of the most visually stunning and decadent desserts on their legendary menu, and recreating this showstopper at home is more achievable than you might imagine.
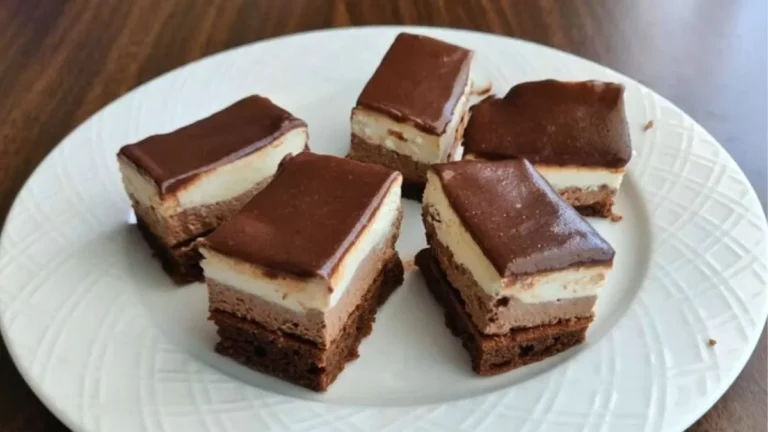
This copycat Cheesecake Factory tuxedo cheesecake features three distinct layers of pure indulgence: a rich fudgy brownie base, a smooth chocolate cheesecake layer, and a creamy vanilla cheesecake top, all crowned with glossy chocolate ganache.
The striking contrast between the dark chocolate and pristine white layers gives this dessert its formal “tuxedo” name, making it perfect for special occasions or whenever you want to impress. This lightened Cheesecake Factory tuxedo cheesecake recipe uses Greek yogurt and whole wheat flour to create a guilt-free version that doesn’t sacrifice the luxurious texture and sophisticated flavor that makes the original so beloved.
What Does It Taste Like?
The chocolate tuxedo Cheesecake Factory experience is a symphony of complementary chocolate and vanilla flavors with varying textures that create pure dessert magic. The dense, fudgy brownie base provides intense cocoa richness and a satisfying chew that anchors the entire dessert.

Moving upward, the chocolate cheesecake layer delivers smooth, creamy decadence with deep chocolate notes that meld seamlessly into the tangy-sweet vanilla cheesecake above it. The Cheesecake Factory tuxedo vanilla layer brings brightness and subtle tang from Greek yogurt and cream cheese, balancing the chocolate intensity below.
Finally, the silky chocolate ganache topping adds a glossy finish with concentrated cocoa flavor and luxurious mouthfeel. Together, these layers create a perfectly balanced bite where no single element overwhelms-just harmonious chocolate-vanilla elegance in every forkful.For more indulgence, try our Creamy Carnivore Cheesecake Recipe or Cheesecake Factory Pineapple Upside Down Cheesecake Recipe.
Ingredients and Kitchen Utensils Lists
Ingredients
For the brownie base:
- 25g (approximately ½) egg
- 42g (2 tablespoons) liquid sweetener (honey or maple syrup)
- 82g (⅓ cup) Greek yogurt
- 14g (1 tablespoon) oil
- ¼ teaspoon baking powder
- ¼ teaspoon baking soda
- ¼ teaspoon vanilla extract
- Pinch of salt
- 10g (2 tablespoons) cacao powder
- 40g (⅓ cup) white whole wheat flour
For the cheesecake layers:
- 285g (1 cup) Greek yogurt
- 230g (8 oz) cream cheese, softened
- 67g (⅓ cup) granulated sweetener
- 75g (approximately 1.5) eggs
- 1 teaspoon vanilla extract
- 15g (2 tablespoons) white whole wheat flour
- 5g (1 tablespoon) cacao powder (for chocolate layer)
For the chocolate ganache topping:
- 30g (2 tablespoons) coconut oil
- 42g (2 tablespoons) liquid sweetener
- 10g (2 tablespoons) cacao powder
- 15g (1 tablespoon) coconut milk
Kitchen Utensils
- Loaf pan (8×4 inch or 9×5 inch)
- Parchment paper or loaf pan liner
- Food processor or electric mixer
- Medium mixing bowls (2-3)
- Small bowl (for ganache)
- Whisk
- Rubber spatula
- Measuring cups and spoons
- Kitchen scale (recommended for precision)
- Sifter or fine-mesh strainer
- Offset spatula (for smooth topping)
- Cooling rack
Preparation and Cooking Time with Serving
Prep Time: 25 minutes
Cook Time: 55-65 minutes (brownie 20-25 min + cheesecake 30-40 min)
Chilling Time: 4-6 hours (overnight recommended)
Total Time: 5-7 hours (including chilling)
Servings: 8-10 slices
Difficulty Level: Intermediate to Advanced
Recipe Instructions with Steps
Step 1: Prepare the Brownie Base Ingredients
Begin your Cheesecake Factory tuxedo cheesecake recipe by preheating your oven to 350°F (175°C) and lining your loaf pan with parchment paper, leaving overhang on the sides for easy removal later. In a medium mixing bowl, crack your egg and measure out exactly 25g (roughly half an egg-you can whisk a whole egg and measure half, or beat it lightly and eyeball half). Add 42g of your chosen liquid sweetener, whether honey for floral notes or maple syrup for deeper warmth.

Step 2: Mix the Wet Brownie Ingredients
Whisk the egg and sweetener together vigorously until well combined and slightly frothy, about 30 seconds. Add 82g Greek yogurt, 14g oil, ¼ teaspoon baking powder, ¼ teaspoon baking soda, ¼ teaspoon vanilla extract, and a pinch of salt. Whisk everything together until you achieve a completely smooth, homogeneous mixture with no lumps of yogurt remaining. The batter should be silky and pourable at this stage.
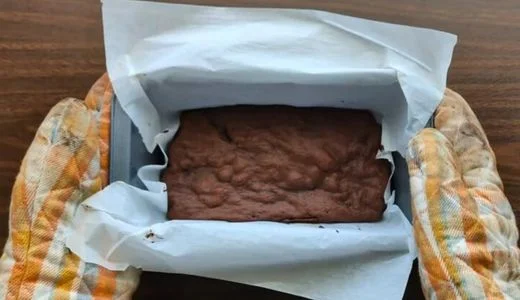
Step 3: Add Dry Ingredients and Bake Brownie
Sift 10g cacao powder and 40g white whole wheat flour directly into your wet mixture to prevent lumps and ensure even distribution. Using a rubber spatula, gently fold the dry ingredients into the wet until just combined-you should see no streaks of flour, but avoid overmixing, which can create a tough brownie. Pour the batter into your prepared loaf pan, spreading it evenly into the corners. Bake at 350°F for 20-25 minutes until a toothpick inserted in the center comes out with just a few moist crumbs. Remove from the oven and let cool completely on a wire rack-this is crucial for the tuxedo Cheesecake Factory layering process.
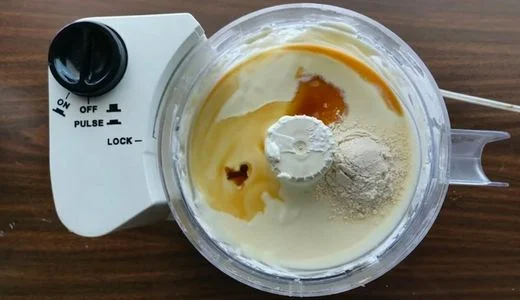
Step 4: Prepare Cheesecake Base Mixture
While your brownie cools, reduce your oven temperature to 325°F (165°C). In a food processor, combine 285g Greek yogurt, 230g softened cream cheese (it should be at room temperature for smooth blending), and 67g granulated sweetener. Process on high speed for 60-90 seconds, stopping to scrape down the sides halfway through, until the mixture is completely smooth, creamy, and no cream cheese lumps remain. This creates the foundation for both your chocolate and vanilla Cheesecake Factory chocolate tuxedo layers.
Step 5: Complete Cheesecake Batter
Add 75g eggs (approximately 1.5 eggs-measure by weight for best results), 1 teaspoon vanilla extract, and 15g white whole wheat flour to the food processor. Pulse 8-10 times, just until all ingredients are fully incorporated and the batter is silky smooth. Avoid over-processing once eggs are added, as this can incorporate too much air and cause cracking during baking. Your cheesecake batter should be thick but pourable, with a glossy appearance.
Step 6: Divide and Create Chocolate Layer
Pour approximately half of your plain cheesecake batter into a separate bowl-eyeballing is fine here, as precise measurements aren’t critical for this copycat Cheesecake Factory tuxedo cheesecake. To the separated portion, add 5g cacao powder. Stir gently but thoroughly with a whisk or spatula until the cocoa is completely incorporated and you have a uniform chocolate-colored batter with no streaks or clumps of powder remaining. This chocolate layer provides the “tuxedo jacket” portion of your elegant dessert.
Step 7: Assemble the Layers
Ensure your brownie base is completely cool to the touch-if it’s even slightly warm, the cheesecake batter will melt and mix improperly. Pour the entire chocolate cheesecake batter over the brownie layer, using an offset spatula or the back of a spoon to spread it evenly to all edges and corners. The chocolate layer should be uniform in thickness. Next, very carefully pour the plain vanilla cheesecake batter on top, starting from the center and allowing it to spread naturally outward. Use gentle movements to encourage even coverage without disturbing the chocolate layer beneath-you want distinct layers, not marbling.

Step 8: Bake the Layered Cheesecake
Place your assembled Cheesecake Factory tuxedo creation in the preheated 325°F (165°C) oven. Bake for 30-40 minutes, checking at the 30-minute mark. The cheesecake is done when the edges are set and slightly puffed, but the center still has a slight jiggle (about a 2-inch diameter area)-it should wobble like barely-set gelatin, not liquid. Overbaking creates cracks and dry texture, so err on the side of slightly underdone; carryover heat will finish the cooking process. Turn off the oven, crack the door, and let the cheesecake cool inside for 30 minutes to prevent thermal shock and cracking.
Step 9: Chill Thoroughly
After the initial cooling period, remove the cheesecake from the oven and let it come to room temperature on a cooling rack, approximately 1 hour. Cover the entire loaf pan tightly with plastic wrap, ensuring it doesn’t touch the surface of the cheesecake. Refrigerate for at least 4-6 hours, though overnight chilling (8-12 hours) produces the best texture and allows flavors to meld beautifully. This extended chilling is essential for the chocolate tuxedo Cheesecake Factory slicing cleanly without falling apart.
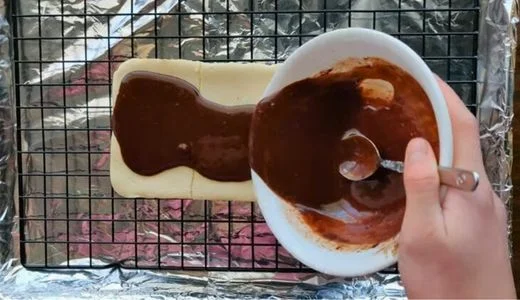
Step 10: Prepare and Apply Ganache Topping
When your cheesecake is fully chilled and set, prepare the glossy chocolate ganache. In a small bowl, whisk together 30g coconut oil (melted if solid), 42g liquid sweetener, 10g cacao powder, and 15g coconut milk. Whisk vigorously for 30-45 seconds until the mixture is completely smooth, glossy, and free of any cacao powder lumps. The ganache should have a pourable but thick consistency-similar to heavy cream. Pour the ganache over the center of your chilled cheesecake and use an offset spatula to spread it evenly to the edges, allowing some to naturally drip down the sides for a professional bakery appearance.
Step 11: Final Set and Serve
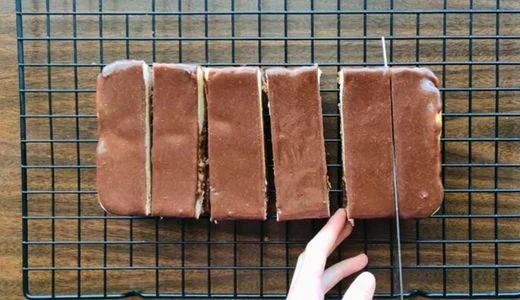
Return the ganache-topped Cheesecake Factory tuxedo cheesecake to the refrigerator for at least 30-45 minutes to allow the topping to firm up and set properly. When ready to serve, use the parchment paper overhang to lift the entire cheesecake out of the loaf pan. Place on a cutting board and use a long, sharp knife, wiping it clean with a hot damp towel between each slice, to cut perfect portions that showcase all the beautiful layers. Serve chilled and watch your guests marvel at your baking prowess.
Customization and Pairing for Serving Ideas
1. Classic Cheesecake Factory Presentation
Elevate your Cheesecake Factory tuxedo cheesecake recipe to restaurant-quality presentation by serving each slice on a white dessert plate with artistic chocolate and raspberry sauces. Drizzle melted dark chocolate in a zigzag pattern across the plate, then add dots of raspberry coulis (pureed raspberries with a touch of sugar, strained). Place your cheesecake slice in the center, add a dollop of freshly whipped cream, and garnish with a fresh raspberry and a mint leaf. This plating technique mirrors the iconic Cheesecake Factory style and turns each serving into an Instagram-worthy masterpiece.
2. Coffee Shop Pairing Perfection
The rich chocolate and creamy vanilla layers of this chocolate tuxedo Cheesecake Factory dessert pair beautifully with various coffee preparations. Serve alongside a classic cappuccino whose milk foam echoes the creamy cheesecake texture, or try it with a strong espresso to cut through the sweetness. For non-coffee drinkers, a chai latte with warming spices or a vanilla-flavored almond milk latte complements the dessert’s flavor profile. The slight bitterness of coffee beverages balances the sweet richness, creating a sophisticated dessert experience.
3. Seasonal Berry Compote Variation
Transform your tuxedo Cheesecake Factory creation into a seasonal showstopper by topping each slice with a warm berry compote instead of additional ganache. Simmer fresh or frozen mixed berries (strawberries, blueberries, raspberries) with a touch of sweetener, lemon juice, and cornstarch until thickened. The bright, tart berry flavors cut through the richness of the chocolate and cream cheese layers, adding a pop of color and fresh fruit dimension that makes this dessert feel lighter and more balanced, especially perfect for spring and summer gatherings.
4. Peanut Butter Lover’s Twist
Create an indulgent variation by adding 2 tablespoons of natural peanut butter to the chocolate cheesecake layer before pouring it over the brownie base. This creates a chocolate-peanut butter middle layer that adds nutty richness and protein. Top the finished cheesecake with chopped peanut butter cups or a drizzle of melted peanut butter alongside the chocolate ganache. This copycat Cheesecake Factory tuxedo cheesecake variation appeals to peanut butter enthusiasts and creates a flavor combination reminiscent of popular chocolate-peanut butter candy.
5. Individual Portion Presentation
For elegant dinner parties or portion control, prepare this Cheesecake Factory tuxedo recipe in individual servings using a muffin tin lined with cupcake papers or small mason jars. Layer a thin brownie base, then chocolate cheesecake, then vanilla cheesecake in each cup. Baking time reduces to approximately 20-25 minutes at 325°F. Top each individual serving with a teaspoon of ganache and garnish with chocolate shavings. These single-serve portions eliminate the need for slicing, ensure perfect layers in every serving, and make portion management effortless for events.
6. Gluten-Free Adaptation
Make this Cheesecake Factory chocolate tuxedo accessible to gluten-sensitive guests by substituting the white whole wheat flour in both the brownie and cheesecake layers with a 1:1 gluten-free baking flour blend or almond flour. When using almond flour, you may need to slightly reduce the quantity (use about ¾ of the called-for amount) as it’s denser than wheat flour. The texture remains wonderfully creamy and rich, and most guests won’t detect any difference from the original recipe, making it an inclusive dessert option.
7. Wine and Dessert Pairing Experience
Transform dessert time into a sophisticated tasting experience by pairing your Cheesecake Factory tuxedo cheesecake recipe with complementary wines. A ruby Port’s sweet, berry-forward profile harmonizes beautifully with the chocolate layers, while a Moscato d’Asti’s light effervescence and sweetness complements the vanilla cheesecake. For a bolder choice, try a late-harvest Zinfandel or chocolate-friendly Cabernet Sauvignon. Serve small wine portions (2-3 oz) alongside modest cheesecake slices for an elegant dinner party finale that encourages conversation and lingering at the table.

Tips Section
1. Achieving Perfectly Distinct Layers
The hallmark of an authentic tuxedo Cheesecake Factory presentation is the sharp definition between chocolate and vanilla cheesecake layers. The key is ensuring your brownie base is completely cool before adding any cheesecake batter-even residual warmth will cause the layers to blend. When pouring the chocolate layer, spread it gently but completely to the edges. For the vanilla layer, pour very slowly from the center, allowing gravity to spread the batter naturally rather than using vigorous spreading motions. If you’re nervous about mixing, try placing spoonfuls of vanilla batter around the chocolate layer, then gently connecting them with minimal movement. The gentle baking temperature also prevents layer mixing during cooking.
2. Preventing Cheesecake Cracks
Cracks are the nemesis of beautiful Cheesecake Factory tuxedo cheesecake presentation. Several techniques prevent this common issue: First, ensure all dairy ingredients (cream cheese, yogurt, eggs) are at room temperature before mixing, which creates smoother batter that bakes more evenly. Second, avoid overmixing once eggs are added-pulse just until incorporated. Third, don’t overbake; the center should still jiggle slightly when done. Fourth, allow gradual temperature changes by cooling in the turned-off oven with the door cracked, then at room temperature, then in the refrigerator. Finally, if cracks do appear, the ganache topping will hide them beautifully-this is why the chocolate topping is so forgiving.
3. Greek Yogurt Selection Matters
Not all Greek yogurt performs equally in this copycat Cheesecake Factory tuxedo cheesecake. Choose full-fat or 2% Greek yogurt for the richest, creamiest texture-fat-free versions will create a slightly grainy, less luxurious mouthfeel. Avoid Greek yogurts with added thickeners or stabilizers like pectin or gelatin, as these can affect how the cheesecake sets. Strained yogurt brands like Fage, Chobani, or Siggi’s work beautifully. The yogurt’s natural tang balances the sweetness and adds protein, making this dessert slightly more nutritious than traditional cheesecake while maintaining incredible creaminess.
4. Sweetener Substitutions and Adjustments
This Cheesecake Factory tuxedo cheesecake recipe offers flexibility with sweeteners, but understanding substitutions ensures success. For the liquid sweetener in the brownie and ganache, honey creates floral notes while maple syrup adds deeper, caramel-like warmth-both work equally well. If using agave nectar, reduce quantities by about 10% as it’s sweeter. For the granulated sweetener in the cheesecake layers, regular granulated sugar, coconut sugar, or granulated monk fruit/erythritol blends all work. If using erythritol-based sweeteners, note they can create a slight cooling sensation and may need 25% more by volume to achieve equivalent sweetness.
5. Mastering the Perfect Ganache Consistency
The glossy chocolate ganache topping is the crowning glory of your chocolate tuxedo Cheesecake Factory creation. Room temperature matters significantly here-if your coconut oil is too cold, the ganache will be thick and difficult to spread; if too warm, it will be runny and may slide off. Aim for a consistency like thick heavy cream that coats the back of a spoon. If your ganache is too thick, warm it slightly (5-10 seconds in the microwave or over a double boiler) and whisk. If too thin, refrigerate for 5-10 minutes, whisking every few minutes until it thickens. Apply ganache while the cheesecake is cold for the smoothest application and most professional appearance.
6. Loaf Pan vs. Springform Pan Considerations
This recipe is designed for a loaf pan, creating tall, dramatic slices of Cheesecake Factory tuxedo, but you can adapt it to a 6-inch or 7-inch springform pan for traditional round slices. In a springform, the layers will be thinner but wider. Baking time may increase by 5-10 minutes since the larger surface area requires longer to set. The advantage of a loaf pan is easier removal using parchment paper overhang and more dramatic height in each slice. If using a springform, wrap the outside with aluminum foil to prevent leaks, and consider a water bath (placing the springform in a larger pan with 1 inch of hot water) for even more creamy texture.
7. Make-Ahead and Freezing Strategies
This Cheesecake Factory tuxedo cheesecake is actually better when made ahead, making it perfect for entertaining. Bake the complete cheesecake (without ganache) up to 3 days in advance, wrapping tightly and refrigerating. Add ganache the day you plan to serve. For longer storage, this dessert freezes exceptionally well for up to 2 months. Freeze the cheesecake without ganache, wrapped tightly in plastic wrap and aluminum foil. Thaw overnight in the refrigerator, then add fresh ganache before serving. The brownie base and cheesecake layers maintain their texture beautifully through freezing, though the ganache is best made fresh. Individual slices can also be frozen separately for grab-and-go dessert portions.

Storage and Reheating Guidance
Store your tuxedo Cheesecake Factory creation covered tightly in the refrigerator for up to 5 days-the flavors actually deepen and improve after the first day. This dessert is best enjoyed chilled, never reheated. For optimal texture, remove from refrigeration 10-15 minutes before serving to take the chill off slightly, which enhances the creamy texture and flavor.
Common Queries and FAQs Section
Here, we’ve got you covered with some common questions that people often ask
Q: Can I make this recipe without a food processor?
A: Yes! While a food processor creates the smoothest Cheesecake Factory tuxedo cheesecake texture, you can use an electric hand mixer or even mix by hand. Ensure your cream cheese is very soft (leave at room temperature for at least 1 hour) and beat it alone first until completely smooth before adding other ingredients. Mix on medium speed for 2-3 minutes to eliminate all lumps. The final texture may be slightly less silky than the food processor version, but still delicious.
Q: Why is my cheesecake layer separating from the brownie base?
A: Separation typically occurs when the brownie layer is still warm when you add the cheesecake batter, or if there’s excess oil on the brownie surface. Always let the brownie cool completely (it should feel cool to the touch, not just room temperature). If your brownie appears very oily after cooling, gently blot the top with a paper towel before adding the cheesecake layer. The slight roughness of the cooled brownie surface helps the cheesecake adhere properly.
Q: Can I use regular all-purpose flour instead of white whole wheat flour?
A: Absolutely! All-purpose flour works perfectly in this copycat Cheesecake Factory tuxedo cheesecake. The white whole wheat flour adds slightly more fiber and nutritional value, but all-purpose creates an equally tender, delicious result with a slightly lighter texture. Use the same measurements called for in the recipe. You can also experiment with cake flour for an even more delicate crumb in the brownie layer.
Q: My ganache looks grainy instead of smooth. What went wrong?
A: Grainy ganache usually results from the cacao powder not fully incorporating or the coconut oil being too cold and solidifying. Ensure you whisk very vigorously for at least 30-45 seconds. If graininess persists, gently warm the mixture for 5-10 seconds in the microwave or over a double boiler, then whisk again. The heat helps the cacao particles dissolve completely into the liquid. Strain through a fine-mesh sieve if needed to remove any stubborn lumps for a perfectly glossy finish.
Q: How do I get clean slices without the layers falling apart?
A: Clean slicing of Cheesecake Factory chocolate tuxedo requires three things: proper chilling (at least 6 hours, preferably overnight), a sharp knife, and the hot water technique. Use a long, thin knife and run it under very hot water, then wipe completely dry. Make one smooth cut straight down without sawing motions. Wipe the knife clean with a hot, damp towel, then repeat for the next slice. The heat slightly melts the cheesecake as you cut, creating smooth edges. Cold cheesecake is also firmer and less likely to compress or smear.
Q: Is there a way to reduce the sugar content further?
A: Yes! This recipe already uses less sugar than traditional cheesecakes thanks to Greek yogurt’s natural sweetness. You can reduce the granulated sweetener in the cheesecake layers by up to 25% if you prefer less sweet desserts. You could also use only vanilla-flavored Greek yogurt, which adds sweetness without additional sugar. For the liquid sweeteners in the brownie and ganache, you can reduce by 10-15%, though less than that may affect texture. Remember that sweetness also balances the tang of yogurt and cream cheese, so taste as you adjust.
Q: Can I add fruit between the layers?
A: While tempting, adding fresh fruit between the Cheesecake Factory tuxedo layers isn’t recommended as fruit releases moisture during baking, which can make the cheesecake soggy and cause layer separation. Instead, serve slices topped with fresh berries, add a berry compote on the side, or create a thin layer of seedless jam (about 2 tablespoons, carefully spread) between the brownie and chocolate cheesecake layer. If using jam, ensure it’s at room temperature and spread very gently to avoid disturbing the brownie.
Q: What’s the best way to transport this cheesecake to a party?
A: The tuxedo Cheesecake Factory cheesecake travels beautifully when properly prepared. Keep it in the loaf pan, covered tightly with plastic wrap, and place the entire pan in a larger container with a secure lid. Transport in a cooler with ice packs to maintain cold temperature. If you’ve already removed it from the pan, place it on a sturdy cutting board or serving platter, cover with a cake dome or inverted large bowl, and keep cold. Always add the ganache topping after arrival and just before serving to prevent sliding during transport.

Cheesecake Factory Tuxedo Cheesecake Recipe
Ingredients
Equipment
Method
- Begin your Cheesecake Factory tuxedo cheesecake recipe by preheating your oven to 350°F (175°C) and lining your loaf pan with parchment paper, leaving overhang on the sides for easy removal later. In a medium mixing bowl, crack your egg and measure out exactly 25g (roughly half an egg-you can whisk a whole egg and measure half, or beat it lightly and eyeball half). Add 42g of your chosen liquid sweetener, whether honey for floral notes or maple syrup for deeper warmth.
- Whisk the egg and sweetener together vigorously until well combined and slightly frothy, about 30 seconds. Add 82g Greek yogurt, 14g oil, ¼ teaspoon baking powder, ¼ teaspoon baking soda, ¼ teaspoon vanilla extract, and a pinch of salt. Whisk everything together until you achieve a completely smooth, homogeneous mixture with no lumps of yogurt remaining. The batter should be silky and pourable at this stage.
- Sift 10g cacao powder and 40g white whole wheat flour directly into your wet mixture to prevent lumps and ensure even distribution. Using a rubber spatula, gently fold the dry ingredients into the wet until just combined-you should see no streaks of flour, but avoid overmixing, which can create a tough brownie. Pour the batter into your prepared loaf pan, spreading it evenly into the corners. Bake at 350°F for 20-25 minutes until a toothpick inserted in the center comes out with just a few moist crumbs. Remove from the oven and let cool completely on a wire rack-this is crucial for the tuxedo Cheesecake Factory layering process.
- While your brownie cools, reduce your oven temperature to 325°F (165°C). In a food processor, combine 285g Greek yogurt, 230g softened cream cheese (it should be at room temperature for smooth blending), and 67g granulated sweetener. Process on high speed for 60-90 seconds, stopping to scrape down the sides halfway through, until the mixture is completely smooth, creamy, and no cream cheese lumps remain. This creates the foundation for both your chocolate and vanilla Cheesecake Factory chocolate tuxedo layers.
- Add 75g eggs (approximately 1.5 eggs-measure by weight for best results), 1 teaspoon vanilla extract, and 15g white whole wheat flour to the food processor. Pulse 8-10 times, just until all ingredients are fully incorporated and the batter is silky smooth. Avoid over-processing once eggs are added, as this can incorporate too much air and cause cracking during baking. Your cheesecake batter should be thick but pourable, with a glossy appearance.
- Pour approximately half of your plain cheesecake batter into a separate bowl-eyeballing is fine here, as precise measurements aren’t critical for this copycat Cheesecake Factory tuxedo cheesecake. To the separated portion, add 5g cacao powder. Stir gently but thoroughly with a whisk or spatula until the cocoa is completely incorporated and you have a uniform chocolate-colored batter with no streaks or clumps of powder remaining. This chocolate layer provides the “tuxedo jacket” portion of your elegant dessert.
- Ensure your brownie base is completely cool to the touch-if it’s even slightly warm, the cheesecake batter will melt and mix improperly. Pour the entire chocolate cheesecake batter over the brownie layer, using an offset spatula or the back of a spoon to spread it evenly to all edges and corners. The chocolate layer should be uniform in thickness. Next, very carefully pour the plain vanilla cheesecake batter on top, starting from the center and allowing it to spread naturally outward. Use gentle movements to encourage even coverage without disturbing the chocolate layer beneath-you want distinct layers, not marbling.
- Place your assembled Cheesecake Factory tuxedo creation in the preheated 325°F (165°C) oven. Bake for 30-40 minutes, checking at the 30-minute mark. The cheesecake is done when the edges are set and slightly puffed, but the center still has a slight jiggle (about a 2-inch diameter area)-it should wobble like barely-set gelatin, not liquid. Overbaking creates cracks and dry texture, so err on the side of slightly underdone; carryover heat will finish the cooking process. Turn off the oven, crack the door, and let the cheesecake cool inside for 30 minutes to prevent thermal shock and cracking.
- After the initial cooling period, remove the cheesecake from the oven and let it come to room temperature on a cooling rack, approximately 1 hour. Cover the entire loaf pan tightly with plastic wrap, ensuring it doesn’t touch the surface of the cheesecake. Refrigerate for at least 4-6 hours, though overnight chilling (8-12 hours) produces the best texture and allows flavors to meld beautifully. This extended chilling is essential for the chocolate tuxedo Cheesecake Factory slicing cleanly without falling apart.
- When your cheesecake is fully chilled and set, prepare the glossy chocolate ganache. In a small bowl, whisk together 30g coconut oil (melted if solid), 42g liquid sweetener, 10g cacao powder, and 15g coconut milk. Whisk vigorously for 30-45 seconds until the mixture is completely smooth, glossy, and free of any cacao powder lumps. The ganache should have a pourable but thick consistency-similar to heavy cream. Pour the ganache over the center of your chilled cheesecake and use an offset spatula to spread it evenly to the edges, allowing some to naturally drip down the sides for a professional bakery appearance.
- Return the ganache-topped Cheesecake Factory tuxedo cheesecake to the refrigerator for at least 30-45 minutes to allow the topping to firm up and set properly. When ready to serve, use the parchment paper overhang to lift the entire cheesecake out of the loaf pan. Place on a cutting board and use a long, sharp knife, wiping it clean with a hot damp towel between each slice, to cut perfect portions that showcase all the beautiful layers. Serve chilled and watch your guests marvel at your baking prowess.
Video
Notes
This Cheesecake Factory tuxedo cheesecake recipe proves that restaurant-quality elegance is absolutely achievable in your home kitchen. The stunning layers of fudgy brownie, rich chocolate cheesecake, creamy vanilla cheesecake, and glossy ganache create a dessert that’s as visually impressive as it is delicious. Whether you’re celebrating a special occasion or simply treating yourself to something extraordinary, this copycat Cheesecake Factory tuxedo cheesecake delivers sophisticated flavor with a healthier twist thanks to Greek yogurt and whole wheat flour.
The beauty of this recipe lies in its make-ahead convenience and customization potential—you can adapt it to suit dietary needs, flavor preferences, and presentation styles while maintaining that signature chocolate tuxedo Cheesecake Factory elegance. Happy baking!
We’d love to hear how this recipe turns out for you! Give it a try, then drop a comment below to share your thoughts and tips with us.
Also, follow along on Pinterest and Youtube for more tasty updates. Your support and thoughts mean the world!